Get in Touch with Mackayhairscissors Company
We use submitted details to respond to your quote request. Read our Privacy Policy.


Blending Shears (40-Tooth+) are precision thinning tools sold under names like hair thinning shears, hair thinning scissors, or simply professional thinning shears — grab one and you should get an expectable result on any haircut: smooth, invisible blending with minimal weight loss. Stylists report drastically different results from identical tooth counts on shears of other models, and the misunderstanding of hair thinning, texturizing, blending and chunking shears causes most customers to choose the wrong tool. This guide is a versatile reference for what makes the difference, choosing the right tooth count, techniques to avoid visible lines and when to purchase a finer blending shear.
| Chunking shears | 5-15 teeth, heaviest bulk removal |
| Texturizing shears | 14-25 teeth, controlled chunking and movement |
| Thinning/blending shears | 30-40 teeth, general blending and softening |
| Fine-blending shears | 38-46+ teeth, finishing, invisible texture |
| Sharpening cadence | Multi-month interval under normal salon use; toothed-blade sharpening needs a specialist |
Every thinning, texturizing, blending, or chunking shear works through the same basic mechanism of hair removal — a percentage of hair taken per closing, depending on tooth placement and geometry, not the tooth count alone. Check different published sources against the same “40-tooth” claim and the reported figures land anywhere between 5% and 40%, which is why count alone shouldn’t be the determining factor in a purchase.
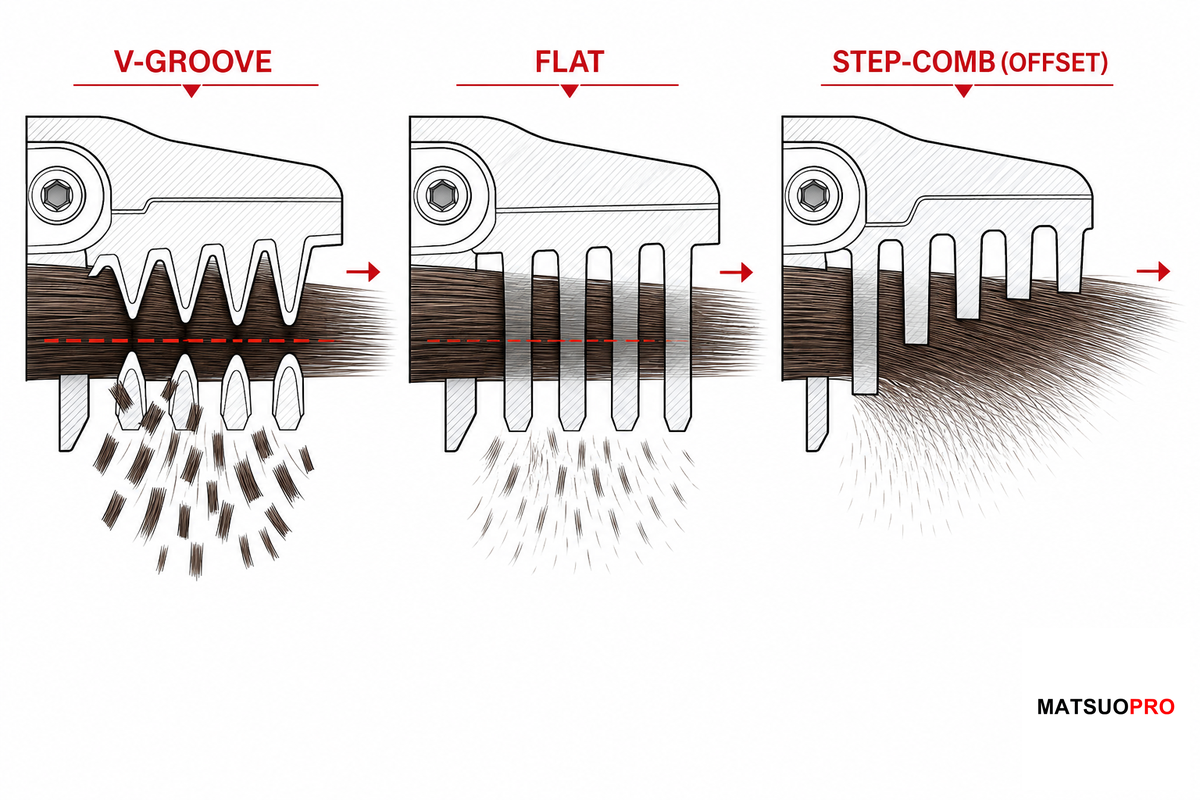
Each tool employs the same design: a smooth blade paired with a toothed blade, with the teeth removing a segment of hair on each pass. What separates them is tooth count, spacing, and tooth shape — and cross-checking published cut-rate data for the same “40-tooth” claim across multiple sources turns up numbers from 5% to 40%, roughly an eight-fold spread that isn’t a labeling error.
Two U.S. utility patents on toothed hair-cutting shears (US 4,660,285 and US 7,841,091) describe removal behavior as a function of tooth length variation and staggered tooth geometry — not tooth count in isolation. Shears that place teeth at differential lengths, or stagger long and short teeth, produce different cutting results than ones with evenly spaced teeth at the same count. The geometry between the teeth, not just how many there are, does the work.
Tooth shape falls into three broad families, and matching the right one to your hair type matters more than chasing a specific count:
Tooth geometry gets most of the attention, but handle design and the shape of the cutting edges affect fatigue over a full day of bookings just as much. An offset handle — where the thumb ring sits lower than the finger ring — keeps the wrist closer to a neutral angle through repeated closings, which matters more the longer a shear stays in a stylist’s hand.
One groomer summarized the practical reality on a professional Facebook page: it’s “not always easy to tell just by teeth count” how much hair a blender actually removes. Read the tooth shape alongside the count, not instead of it.
Cross-checking multiple published tooth-count charts against each other (rather than trusting any single one) turns up eight recurring bands. Use it as a starting map, not a precise lookup table — see the Engineering Note above for why the exact percentage still depends on tooth geometry.
| Type | Teeth | Removal / Pass | Cut Line Left | Primary Job |
|---|---|---|---|---|
| Heavy chunker | 5-7 | 40-70% | Chunky notches | Aggressive bulk removal, thick hair |
| Chunker | 10 | 35-50% | Visible | Shag/wolf separation |
| Texturizer | 14 | 25-40% | Visible separation | Controlled chunking, movement |
| Light texturizer | 16-20 | 20-30% | Soft separation | Long layers, face-framing |
| Standard thinner | 25-30 | 15-25% | Low | Everyday weight removal, medium density |
| Blender | 35 | 15-25% | Faint | General blending, scissor-line softening |
| Fine blender | 40 | 10-15% | Very faint | Blunt-edge polish, fine finishing |
| Ultra-fine finisher | 46+ | 5-15% | None — line-free | Extension seams, invisible texture |
Do not shop by tooth count alone. A 40-tooth V-groove shear and a 40-tooth step-comb shear have completely different cutting results, despite the identical count indicated on the label.
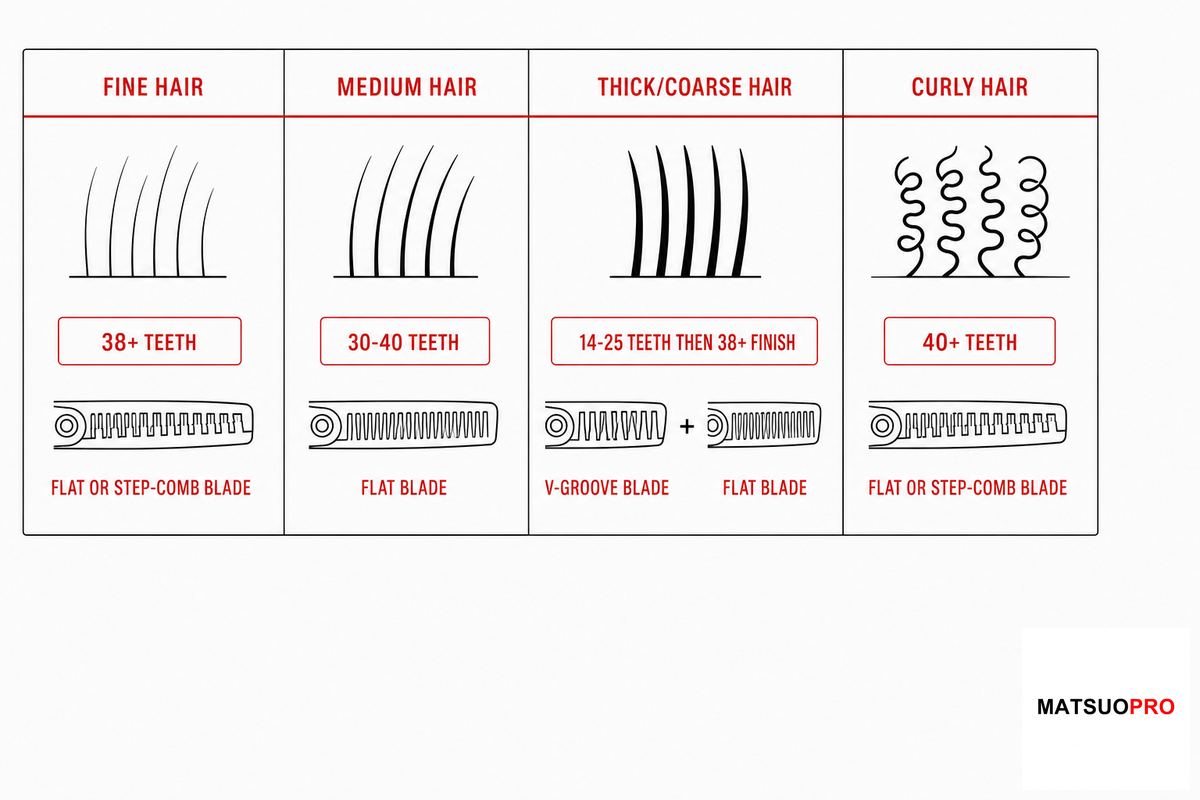
Once you’ve got your head around the four categories of tools, the next step in practice is choosing tooth counts and shapes to match the hair in front of you — cosmetology training standards teach sectioning and cutting technique specifically adjusted for hair texture, not a one-size tool. When you pick the wrong tool, fine hair and thick hair fail in opposite directions: fine hair ends up with stripes and holes; thick hair just doesn’t lighten at all.
| Hair Type | Tooth Count | Blade Type | Why |
|---|---|---|---|
| Fine hair | 38+ | Flat or step-comb | Wider spacing leaves visible holes or stripes on thin density |
| Medium hair | 30-40 | Flat | Most forgiving range; technique (angle, passes) adjusts removal without switching tools |
| Thick, coarse hair | 14-25, then finish at 38+ | V-groove, then flat/step-comb | Bulk removal first, then blend to soften the transition |
| Curly hair | 40+ | Flat or step-comb | Curl pattern tightens and exaggerates any cut line that would be invisible on straight hair |
“A well-rounded stylist should have at least two texturizing shears in their kit — one to thin, one to add texture.”
— Yu, quoted in Modern Salon’s stylist Q&A on texturizing shear selection
For day-to-day bookings, working across medium-density hair doesn’t require changing tools, but a two-shear kit–one medium-density blender and one tooth finisher of 38+–can work equally well on clients with fine, thick, and curly hair — making both genuinely worthwhile tools in a stylist’s kit rather than one being a redundant purchase.
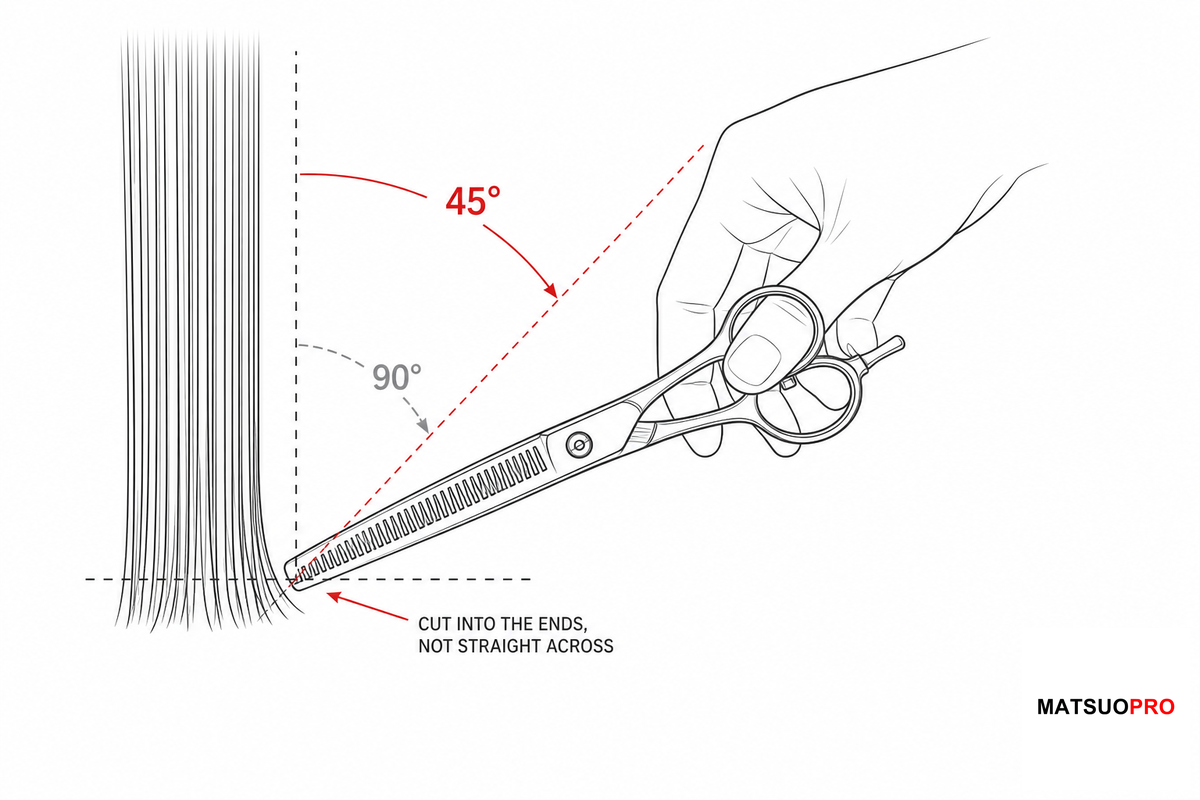
Technique influences the removal rate as much as the shear itself does, and the wrong technique is the structural reason a correctly-chosen shear still leaves a visible step. Cosmetology curriculum teaches a consistent core method: point the shear into the section at roughly 45° and cut into the ends rather than straight across, so the removal blends instead of stepping.
MATSUOPRO’s own production and QC team notes that on a fine tooth count, the failure point is rarely the steel grade on paper — it’s tooth-tip consistency after CNC grinding. One rough tip out of forty is enough to catch and pull on fine hair, which is exactly the kind of inconsistency that makes the same nominal technique feel different from one shear to the next.
Imagine a hairdresser texturizing medium-density hair for a shag hairstyle.
At a 90° elevation and with a 20-tooth texturizing shear, two light passes through the mid-shaft add movement without disturbing the overall shape. With the same two passes using a 10-tooth chunker shear in the same location, visible holes could be created that take weeks to grow out.
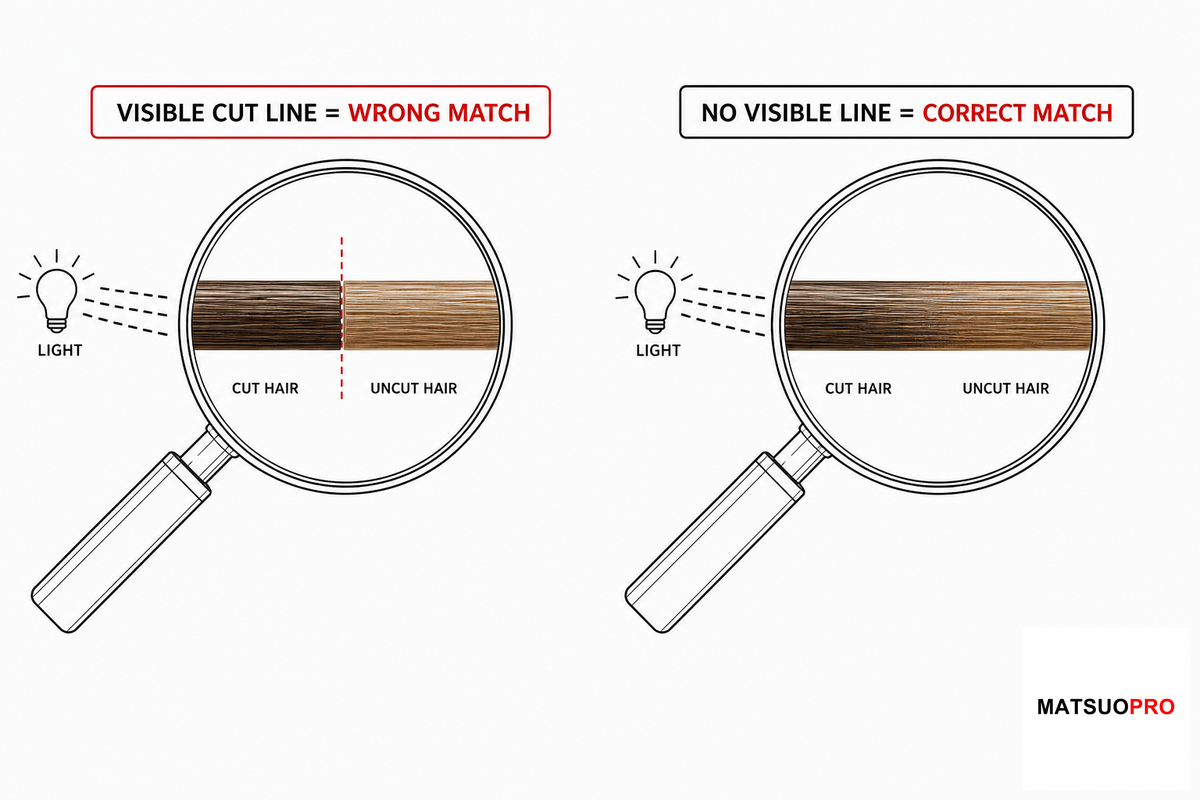
Most visible thinning-shear damage traces back to technique, not the tool category itself — the root cause is almost always poor sectioning or repeated passes in the same spot, according to stylist-reported mistake patterns. Scissors don’t change follicle density or make hair fall out — they only remove volume from hair that’s already there, and any damage that does happen is preventable in nearly all cases.
Are you unsure if you’ve the right shear and technique for the hair?
Take one strand of hair from an obscure section and examine it in normal light. A clear line of demarcation between the cut and uncut hair shows the tool or angle is incorrect.
Damaged, over-processed, or chemically treated hair requires a more gentle approach than the tables below would suggest. Compromised hair shafts are more susceptible to breaking under the same angle and pass count as you might perform on virgin hair. When in doubt, use the Cut-Line Test after one very light pass before committing to a second.
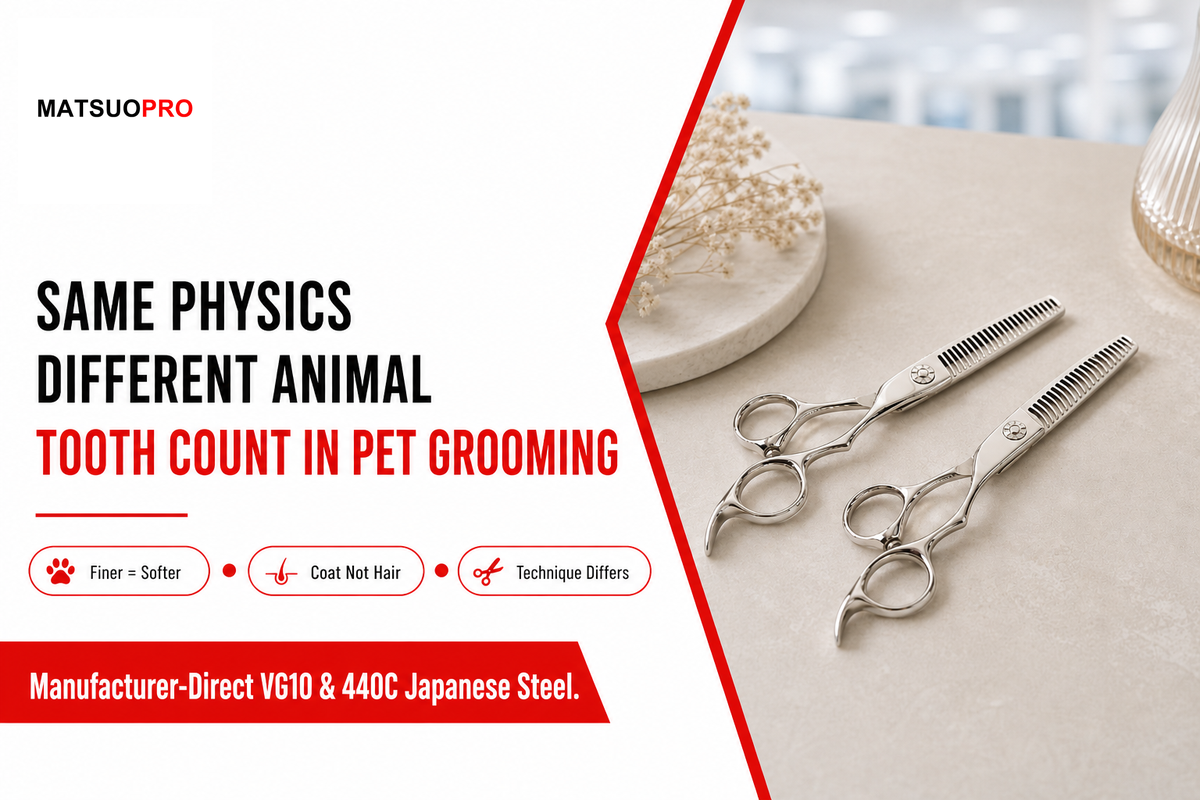
The same tooth-count and blade-geometry principles translate directly into pet grooming, regardless of species: a finer tooth count still translates to a softer, less harsh removal on a dog or cat’s coat, for the same underlying reason it does on human hair.
What does not translate directly is technique: a coated dog, a double coat, and skin sensitivity on a moving animal is a completely different proposition from that of a seated human client. If your main use case is pet grooming, be sure to consult our dedicated guide to thinning shears for dogs to cover breed specifics, coating considerations, and common pitfalls in greater depth than this brief section allows.

Toothed blades need more attentive care than a straight cutting shear, and the risk is structural: hair fragments trapped between the teeth cause corrosion because the tooth gaps hold moisture and debris a straight edge would simply wipe clean. In practice, even a well-made stainless steel blade dulls faster than expected when it isn’t cleared after every client — a mistake that shortens the working life of an otherwise well-built tool.
A sharpener who only sharpens the flat blade and fails to check for tooth alignment can ruin the tool.
Tool sanitization is not just good hygiene, as all U.S. state cosmetology boards mandate some form of sanitation for non-electrical tools. For shears in particular, state regulations often have their own procedure apart from the standard.
The California Board of Barbering and Cosmetology, for example, specifies immersion in an EPA-registered liquid disinfectant for most non-electrical tools, but shears are specifically exempt and instead require spray or wiping with a registered disinfectant (similar to electrical tools, due to the jointed mechanism). Consult your state’s current guide lines, as procedures may differ.

The previous discussion covers tooth counts of 25-40, which are appropriate for most everyday blending needs. Once you’re dealing with fine hair, undetectable extension blends, or finish work where any sort of line needs to be avoided, that’s when you should move up to a specialized fine-blending shear in the 40-46+ tooth range.
MATSUOPRO’s 40-46 tooth fine-blending shears (MP-SC-046) were specifically created for that finishing work: crafted with VG10 japanese steel at HRC 60-62, featuring a hand-honed convex edge blade, and sourced directly from a manufacturer that provides transparency on their steel grade and hardness, rather than simply a brand name. More information on tooth-count to removal breakdown, steel grade comparisons, and their OEM/private label program can be found on their dedicated product page.
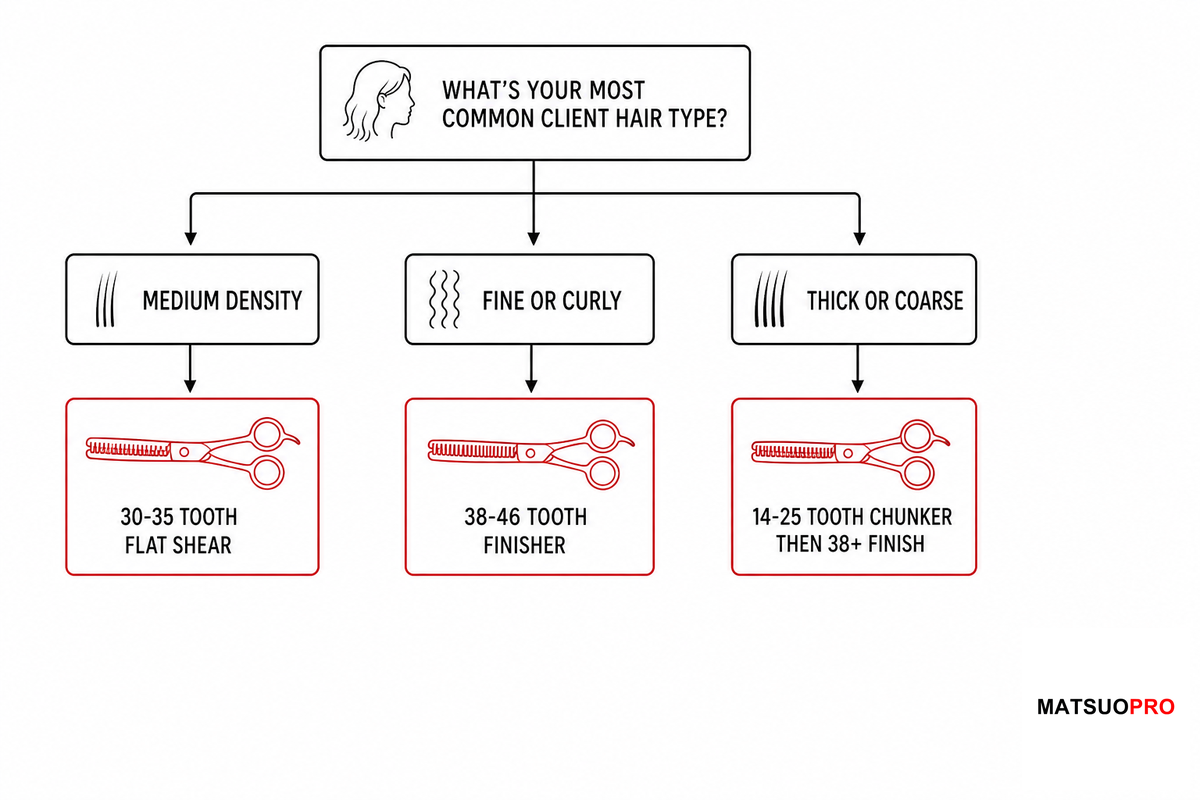
Buying one shear and expecting it to solve every hair type that sits in the chair is the most common expensive mistake in practice, and it leads stylists to blame the tool when it under-performs on clients it was never suited for. Match the tool to the situation instead:
If you already know you’re shopping the fine end of that range, MATSUOPRO’s 40-46 tooth flagship is a factory-direct starting point rather than a reseller markup.
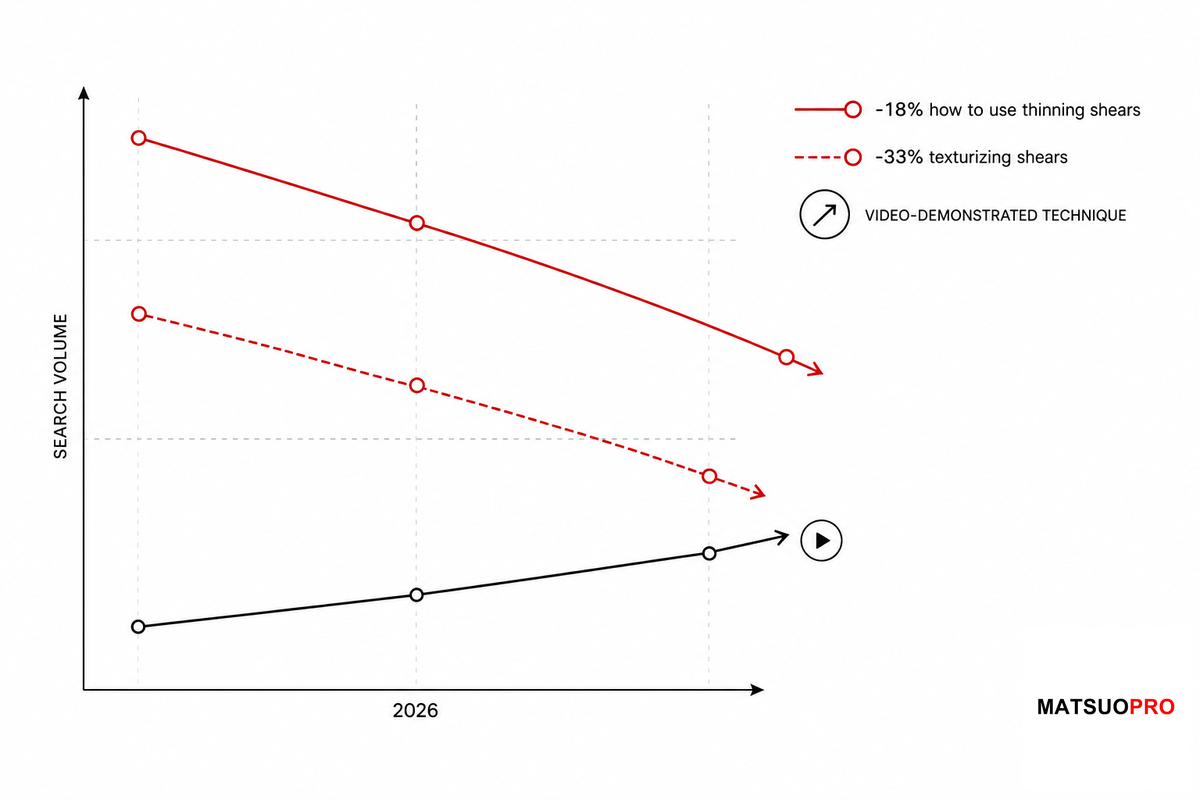
Search demand for “how to use thinning shears” and “texturizing shears” both declined year-over-year in 2026, down 18% and 33% respectively (shown below), even as the difficulty of ranking for either term stayed near zero — a gap between falling search volume and unchanged competition that’s worth reading carefully before writing off the topic.
If you are currently expanding or updating a collection of thinning shears before the upcoming season, make it a priority to purchase at least two, including a mid-range blender and a fine finisher, rather than expecting one tool to cater to all hair types that sit in your chair.
In contrast, texturizing shears have fewer, wider teeth (approximately 5-25), engineered to create visible texture through separation, movement, and chunkiness rather than seamlessly blending. While these terms can be used interchangeably in informal settings, such as referring to thinning shears as “blending shears” and texturizing shears as “chunkers,” the actual tooth spacing and functionality of these tools differ significantly, rather than just being two different names for the same implement.
When a shear begins pushing hair, leaving extra lines, or cutting unevenly, it’s an indication that it is time for a sharpening, regardless of the elapsed time.
This guide was compiled by MATSUOPRO’s technical team, manufacturers of professional hair and pet-grooming shears since 2014. The tooth-geometry breakdown draws on two U.S. utility patents governing differential and staggered tooth design that inform how our own 80-step build process approaches blade engineering. Cut-rate figures are cross-checked across multiple independent published sources precisely because our own manufacturing experience is that a single tooth-count number, taken alone, undersells how much blade geometry changes the result.
MATSUOPRO is the Mackay Hair Scissors manufacturing brand for professional hairdressing shears, barber scissors, thinning shears, and pet-grooming scissors. We support salons, distributors, academies, grooming brands, and private-label buyers that need factory-direct production with practical material guidance.
Our buying guides are written to help purchasers compare steel grades, handle styles, blade geometry, surface finishes, logo options, packaging, MOQ, and sample validation before placing an OEM or wholesale order. The goal is to make each scissors specification easier to discuss with a real production team.
Factory-direct supply since 2014, with product lines covering professional cutting shears, barber shears, thinning scissors, texturizing scissors, left-handed models, and pet grooming scissors for international B2B customers.
We focus on Japanese 440C, VG10, and ATS-314 steel choices, convex and bevel edge geometry, ergonomic handle balance, tension systems, logo engraving, private-label packaging, and sample-based OEM confirmation.