Get in Touch with Mackayhairscissors Company
We use submitted details to respond to your quote request. Read our Privacy Policy.

Thinning shears for dogs are texturizing tools with one notched blade instead of two smooth edges, and they look easy to pick up but are tough to use properly. Their blades resemble simple scissors, but the notched edges change how they behave against the coat, catching only 10-50% of the hair per stroke depending on tooth spacing.
| Blade angle | ~45° to the coat, teeth up, tip pointed away from skin |
| Direction | Parallel to hair growth, never against it |
| Distance from skin | 2–3 inches; never at the root line |
| Cuts per section | 2–3, checking the coat between each |
| Never on | Matted, tangled, or burr-tangled coat |
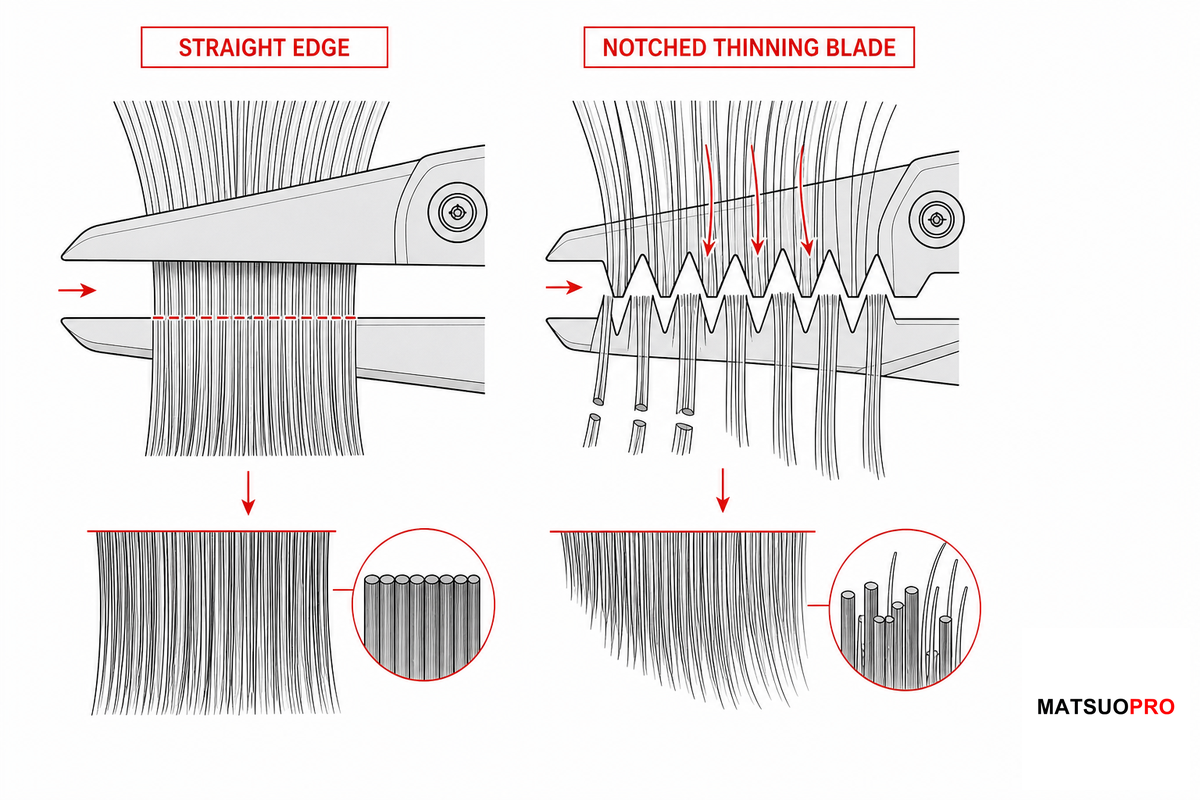
A thinning shear contains a single notched blade, unlike two smooth edges, enabling it to grasp only a portion of the hair and slice just that section while letting the rest slip free. This partial-catch design is what separates a soft, blended transition from the abrupt visual line a straight-edge clipper or scissor leaves behind, and it’s why groomers keep both tools in the kit rather than relying on either alone.
That removal-rate mechanism is identical to that used by human hairdressing thinning shears. Dog models use a steel and tooth profile that’s tailored for coats rather than a human-hair pattern, including MATSUOPRO’s thinning shears for dogs, forged to 58-60 HRC around this tooth-to-removal ratio for pet coats.
One professional grooming school presents thinning shears not only as a bulk-removing tool, but also as the stylist’s “eraser,” used to soften a clipper line rather than simply thinning the coat down. You use the same blade for both, but change the angle and pressure, and the amount you take off.
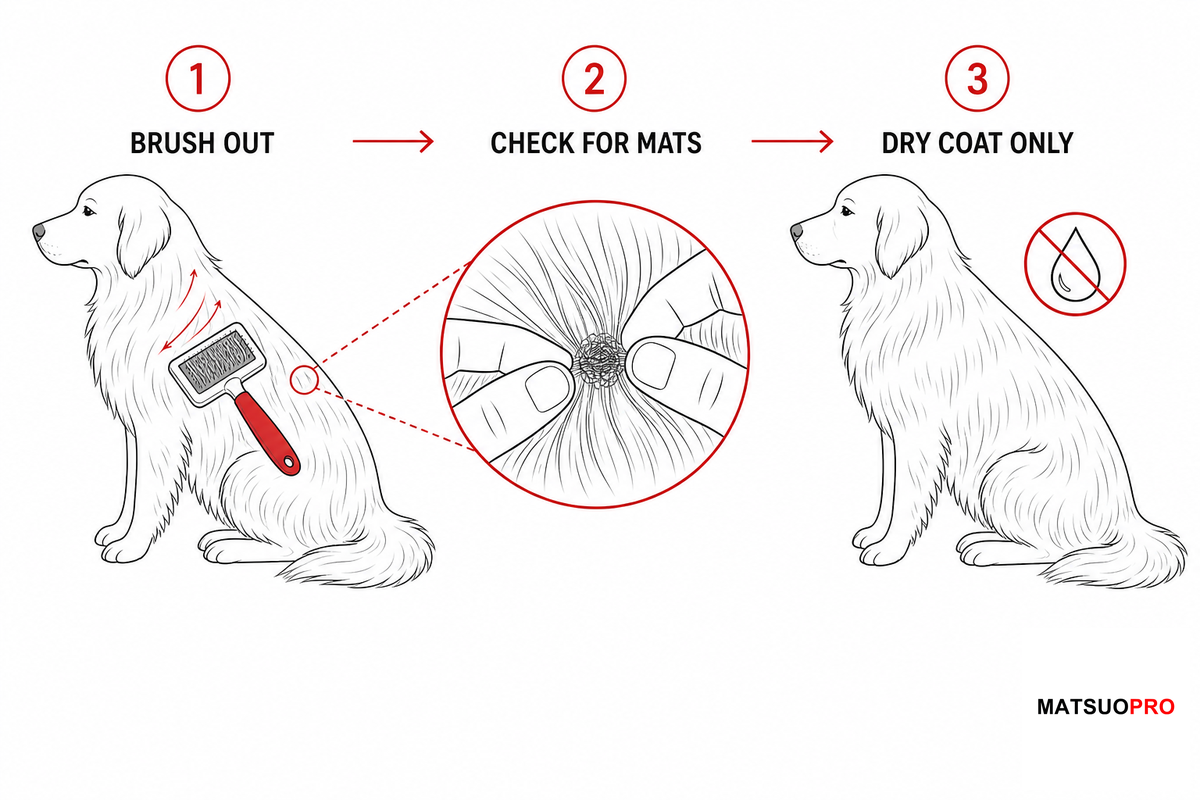
Should I use my thinning shears wet or dry? They’re a finishing tool used on dry coat only. After bathing and fully drying your dog, brush out his coat until each section slides freely through the brush or comb.
Never use thinning shears to cut out mats, tangles or burrs. As one professional groomer wrote on the r/doggrooming forum: “we never ever cut mats out with scissors. That can be very dangerous.” The notched blade can grab under a tangle in a way a solid blade won’t.
If you are truly facing an untreatable mat and don’t have any clippers, a less harmful alternative (not a de-tangling method) is to cut upward into the mat at an angle rather than straight across, which prevents creating a noticeable gap. Consider that a last-ditch effort, not a technique.
This isn’t a soft recommendation – it’s incorporated into training standards. The AKC’s National Core Professional Dog Grooming Educational Standards, standard PPGP7.5, dictates that groomers check the coat for mats and have a specific dematting protocol in place prior to working with shears, and standard PPGP7.6 states that a groomer must explain the trade-offs of shaving to the client and get written consent, rather than cutting the mats themselves. Accredited grooming programs now build this kind of safety protocol directly into their required coursework before a student ever grooms a client’s dog.
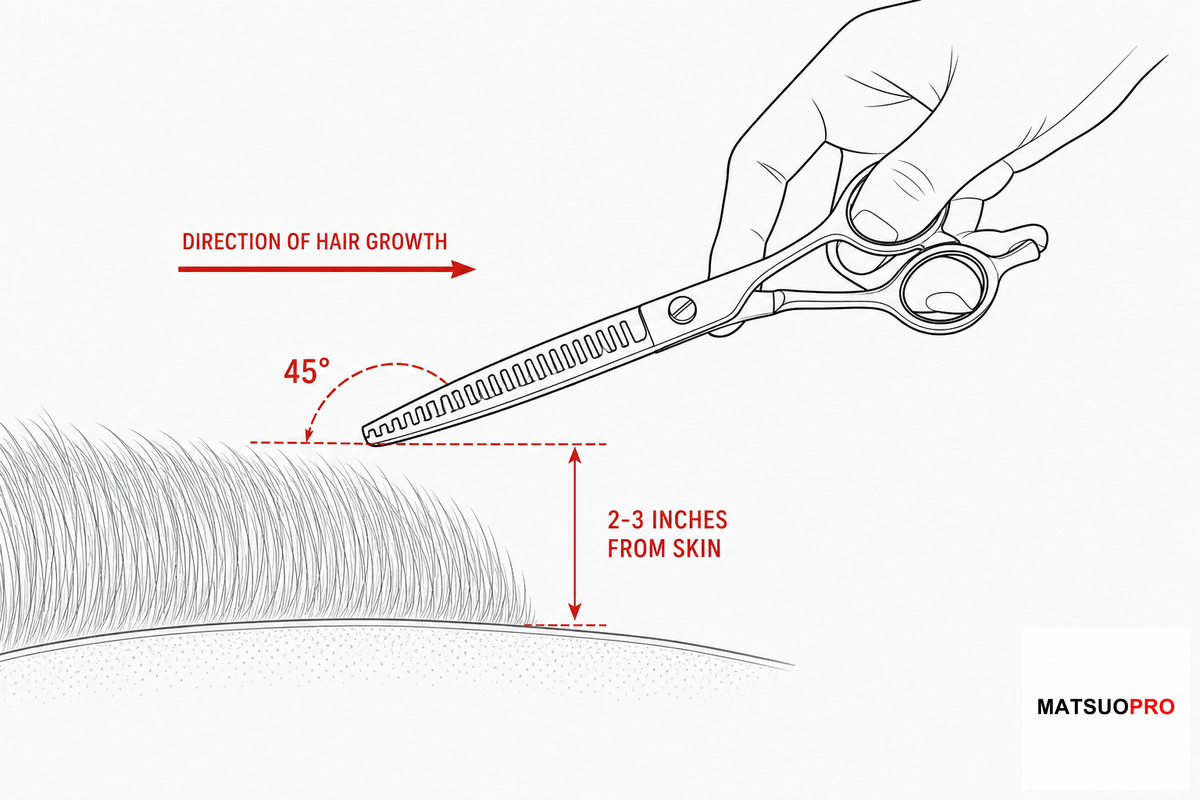
How do I use thinning shears on my dog?
Insert your thumb into the smaller hole, your ring finger into the larger hole, resting the shank on your pinky finger to balance. Control all movement using your thumb.
Get the angle wrong by even 10-15 degrees and a pass that should soften a line instead cuts a visible step into the coat — it’s the single most common mistake in a first attempt, and the risk goes up the longer you go without stopping to check.
“A convex edge holds a sharper angle than a beveled one, which is exactly why it needs a lighter, more deliberate hand, you’re not sawing through the coat, you’re letting the notch do the work while you guide the angle.”
Two to three cuts should do the job for most sections. Close the shear, open a bit to slide it down, close, then open, checking the coat as you go — a grip and pacing method that traces back to the same technique taught at professional grooming schools.
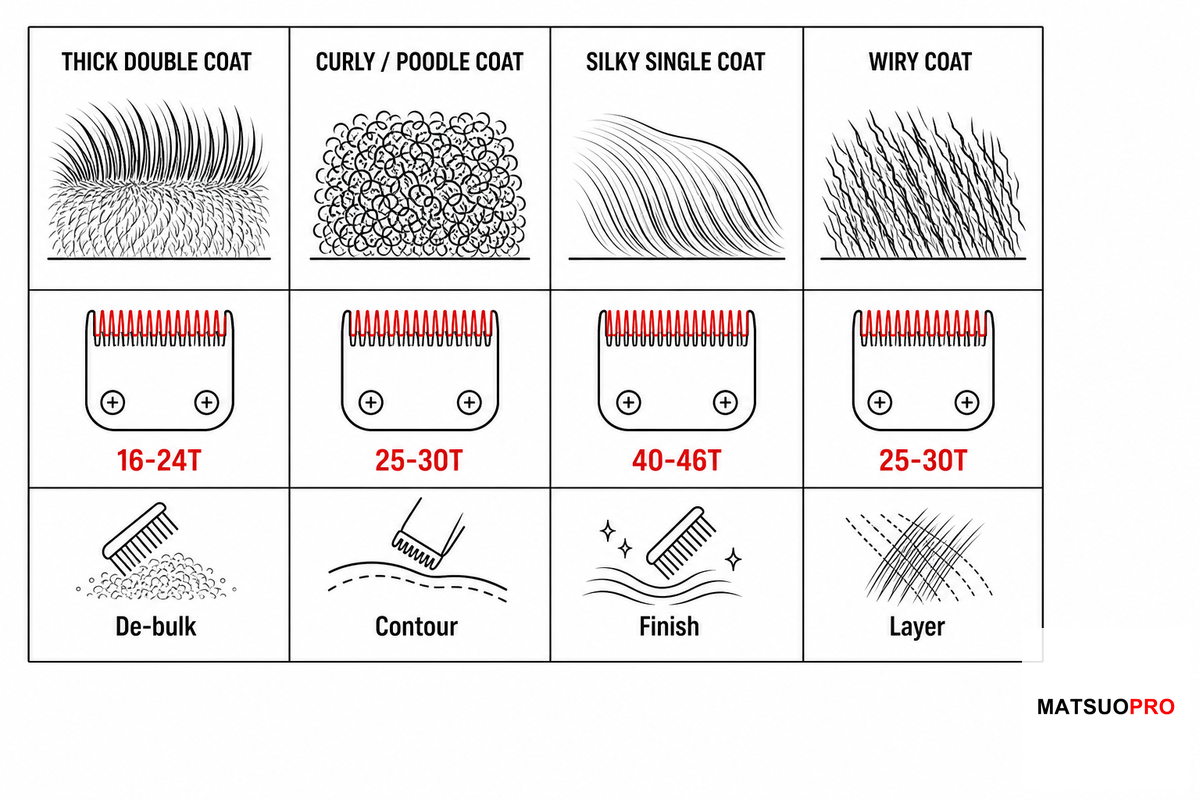
AKC PPGP7.1, which specifies choosing the tool that matches the coat being handled, also translates into a specific process of matching the tooth-count to the density of the coat. Pick the wrong band and the risk is concrete: a 40-46 tooth finishing blade barely dents a matted 20-24 tooth-range double coat, while a wide 20-24 tooth blade on a fine, silky coat can strip 40-50% of the hair in a single pass and leave a bald-looking patch.
| Coat type | Tooth count | Technique adjustment |
|---|---|---|
| Heavy, dense, or curly topcoat (poodle-type) | 20–24T | Wider-spaced teeth remove ~40–50% per pass; fewer total passes needed |
| Double coat, topcoat pass | 25–35T | Standard band on guard hairs; ~25–35% removal per pass |
| Double coat, undercoat blend | 20–24T | More aggressive removal needed to thin dense undercoat bulk |
| General / mixed coats (most pet dogs) | 30–39T | Balanced ~25–35% removal rate; the recommended starting point for beginners |
| Fine or thin (finishing work on any coat) | 40–46 tooth | Closer-set teeth remove ~10–20% per pass, for a finer, softer finish |
| Silky or long (Yorkie-type) | 40–46T | Minimal removal; precision point-cutting only, not bulk passes |
| Wire coat (terrier-type) | 25–35T | Standard band, though hand-stripping is often preferred for this coat |
| Large double-coated breeds (Newfoundlands) | Long-blade, 20–24T | A longer 7–7.5-inch blade clears bulk faster across a larger surface area |
| Puppy coat, first groom | 30–39T | Same general-purpose band; fewer passes and shorter sessions, not a different tool |
This same logic apply to thinners, blenders, and chunkers in different packaging; MATSUOPRO’s tooth-count-to-removal ladder covers dog thinning shears in depth, and its curved-blade options are specifically designed for use on legs and chest. Understanding different coat types is a core professional skill today rather than an add-on, according to one source within the grooming industry, and MATSUOPRO’s coat breed selector tool can assist in selecting the appropriate tool.
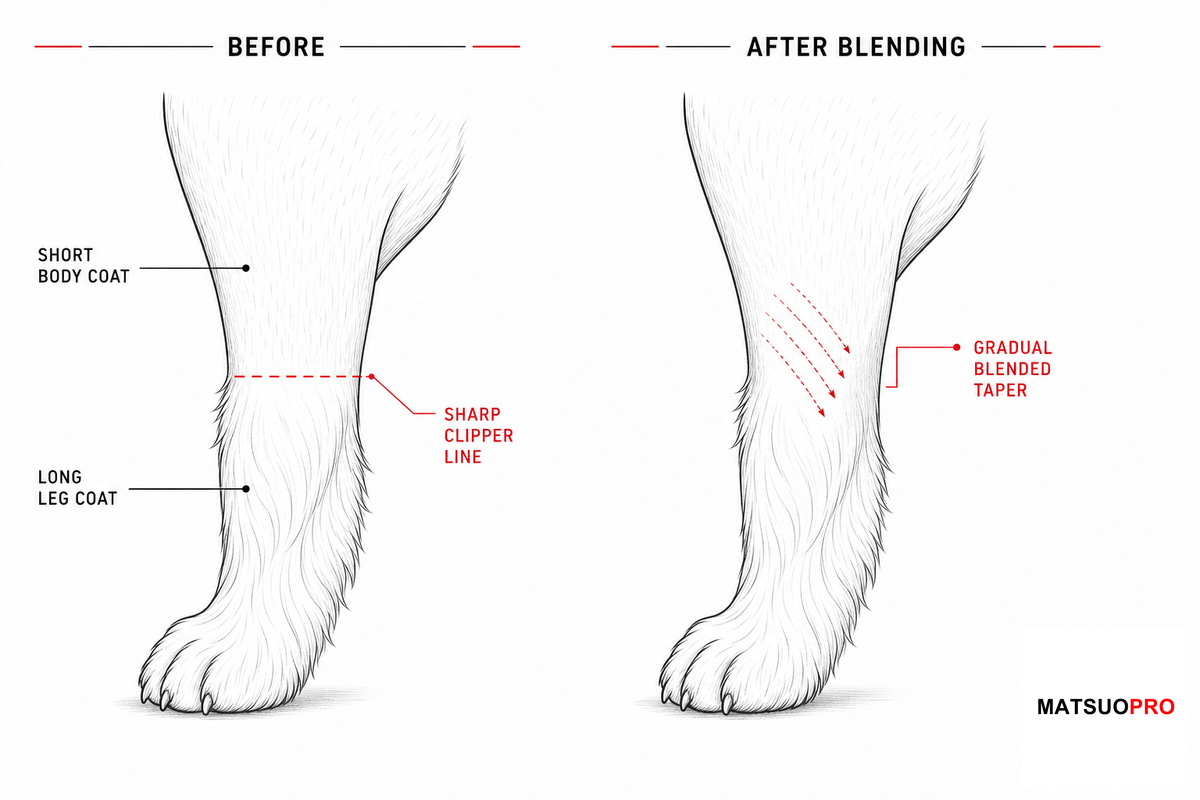
A clipper leaves a hard line wherever a short length of hair meets a longer one – at the neck, shoulder, or where a leg attaches to the body. Left alone, that line stays visible for the 4-8 weeks until the next groom, which is the usual complaint that sends a home groomer looking for a fix. Thinning shears blend the line without redoing the clip.
Maintain the same ~45-degree angle on the blades as you used for the bulk removal but slow down and check the transition line every two or three snips. It’s a common rookie error to rush this stage, inadvertently re-introducing a line where you’re trying to achieve a soft edge. A groomer on r/doggrooming offered this tip that makes a visible difference: cut in the same direction the hair is growing, rather than against it.
When you cut against the grain, the choppy, uneven lines that are so typical of beginner tool-ing are produced. You’re mistakenly blaming the tool for the direction you’re cutting, not the actual tool itself. Once the angle and direction are consistent, you won’t see the line from across the room — the same standard behind AKC’s PPGP tool-selection criteria assumes this level of control.
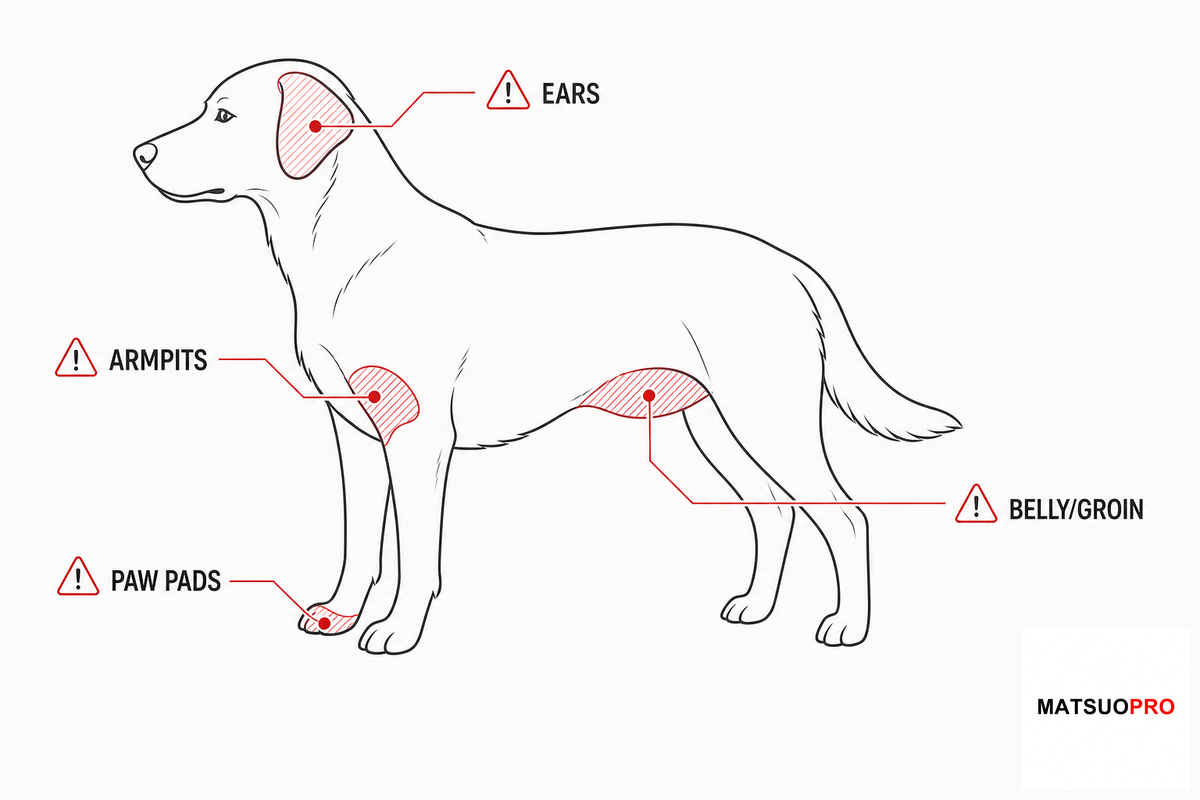
One groomer on r/doggrooming described their experience with a pair of curved shears: “I accidentally cut a dog’s paw pad so badly it just wouldn’t stop bleeding.” These aren’t the words of a beginner who’s over-exaggerating; they’re the words of an unfamiliar person with an unfamiliar tool encountering a sensitive part of a body. Paw pads, inside of ears, and tuck-ups are the areas where this most often happens, and a single wrong pass on a paw pad can mean 15-20 minutes of pressure to stop the bleeding — a real cost for a mistake that a slower first pass would have avoided.
The UK’s Canine & Feline Sector Group guidelines plainly state the underlying rule: if welfare is compromised according to these signs, don’t proceed, and a session shouldn’t exceed three hours unless the groom facility has a daycare license. Similarly, the AKC’s SHBM4.10 standard requires modifications for young and old dogs: shorter sessions with additional breaks, as opposed to more patience from the helper holding the dog in place.
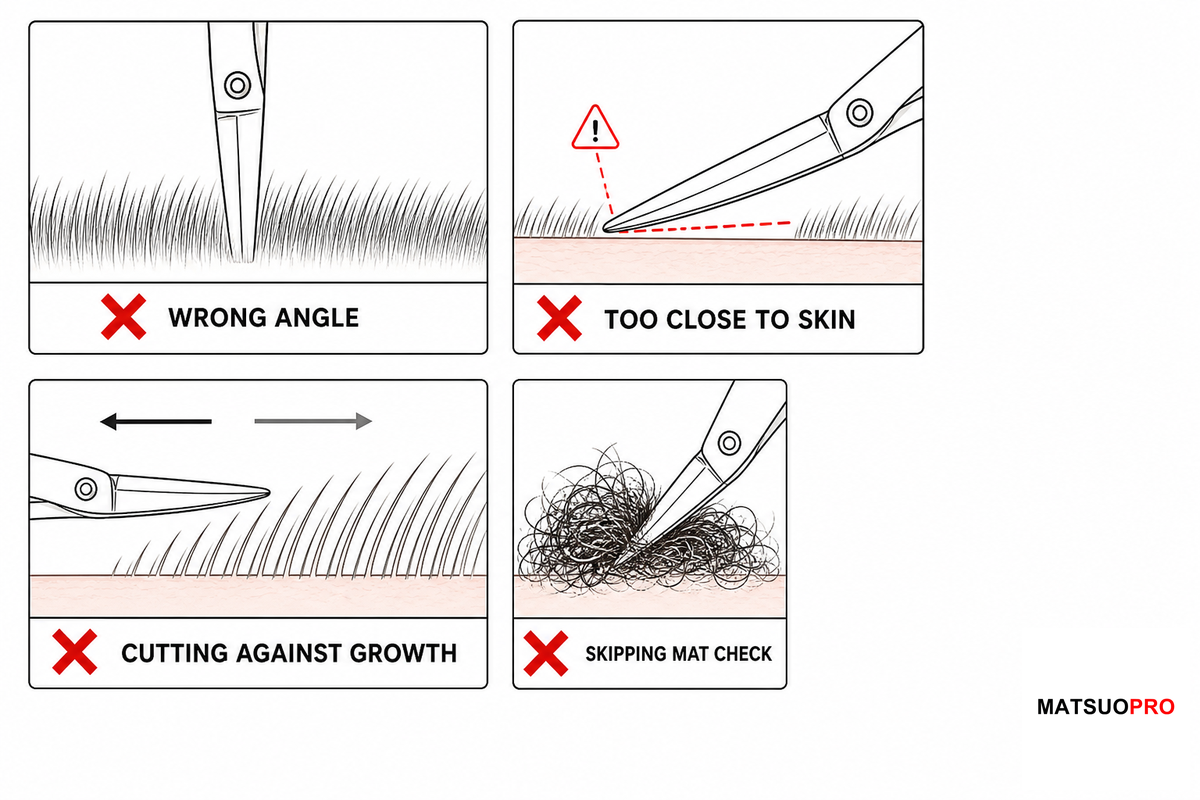
Over-thinning is one of the most frequently cited mistakes across grooming resources-the ease of the tool can lull you into removing too much hair, resulting in a thin, patchy coat that should have a blended appearance.
| What you see | Likely cause | Fix |
|---|---|---|
| Sparse, patchy-looking coat | Too many passes without reassessing | Cut in 2–3-snip increments; comb and check between each |
| Short, spiky regrowth | Cutting too close to the root | Start cuts 2–3 inches from the skin, never at the root line |
| Visible hard lines instead of a blend | Cutting against the direction of hair growth | Keep blades parallel to growth direction, re-check the angle |
| Shears catching or snagging mid-cut | Poor hand fit, tension too loose, or excess side pressure | Re-check grip; have tension adjusted; let the blade do the work |
| Coat pulls or the dog flinches | Moving too fast, hair getting trapped instead of cut | Slow the pace; a fine comb between shear and skin adds a safety barrier |
Focus on that fourth line, again: a groomer on r/doggrooming mentioned three mechanical reasons why shears will catch mid-cut, each fixable before you start your next pass: “hand that doesn’t fit the tool, tension too loose or too much side-to-side pressure.” Trade-school guidance on shear selection backs up the hand-fit point specifically.
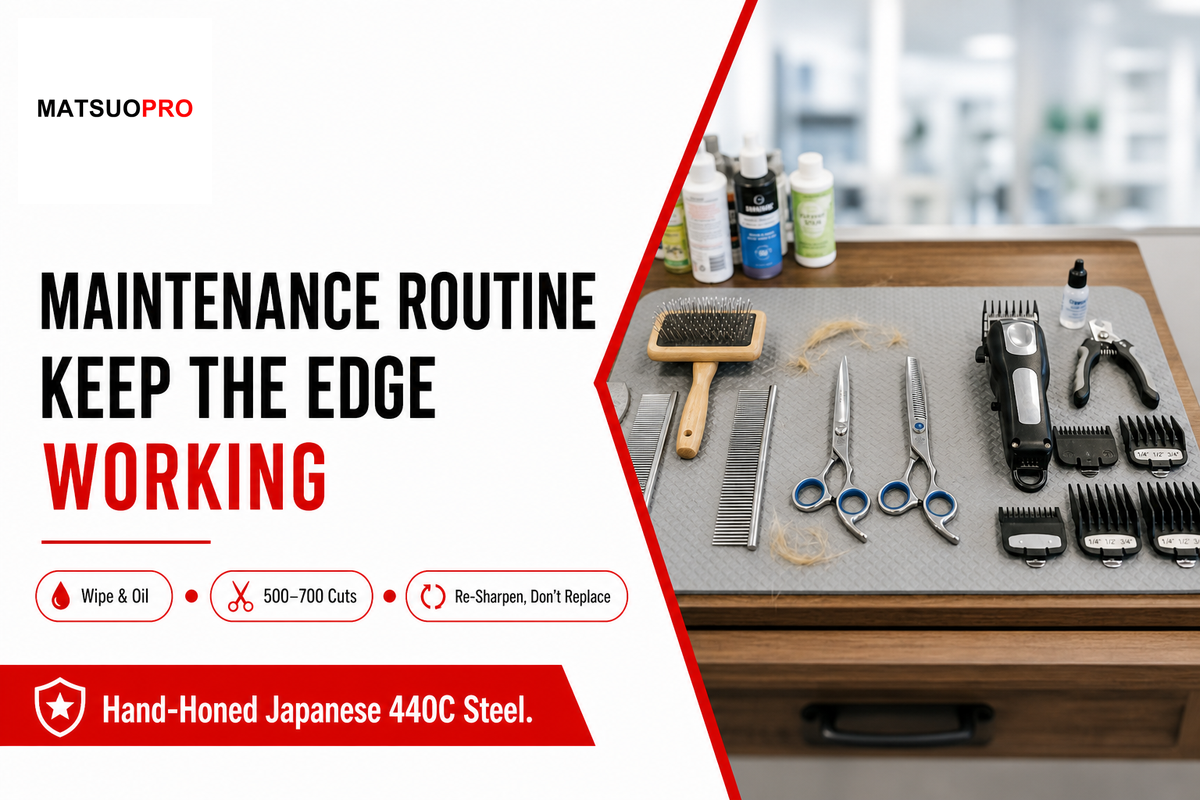
After each grooming session, use a soft, lint-free cloth to remove loose hair and debris from the blades, apply a tiny drop of shear oil to the pivot, then wipe away the excess. Dry, dirty pivots are why grooming tools start to feel stiff during a cut long before the actual edge is dulled — the risk of skipping this for even 2-3 sessions is a shear that catches and pulls instead of cutting cleanly.
A high-quality pair of shears in this range generally costs $150 to $350, a factor worth considering before treating any part of this routine as optional. It’s a small detail, but it’s what lets a well-honed edge extend the life of the shear — every MATSUOPRO blade starts as Japanese stainless steel, 440C Japanese steel specifically, not a generic stainless steel alloy, which is part of why the grooming experience stays consistent groom after groom rather than degrading like cheaper pet supplies do.
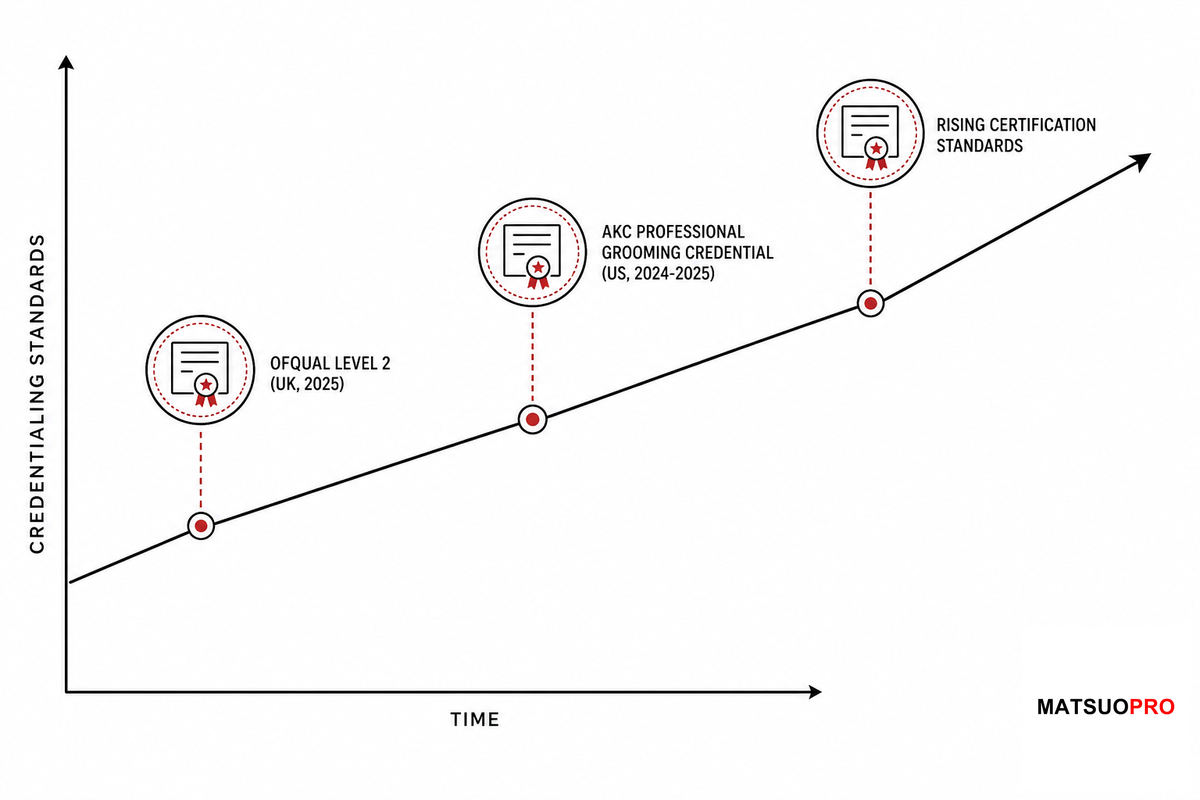
Grooming is evolving into a more credentialed profession than most home groomers realize, which has implications for what’s considered “professional advice.” In the UK, the Canine & Feline Sector Group published new national best-practice grooming guidelines in June 2025 recommending a minimum OFQUAL Level 2 qualification plus ongoing continuing professional development for every groomer. The US has seen the rollout of the AKC’s Professional Grooming Credential exam (2024-2025), which assesses eight areas of knowledge and skills, including safe and humane handling; the governing body itself acknowledges that grooming previously had “no license, no national exam, no unified training standard.”
That written-consent requirement for shaving discussed previously (AKC PPGP7.6) is a similar example of this formalization, offering a concrete standard that home groomers can hold themselves to, not just professionals. For any aspiring grooming setup in 2026, that translates into budgeting for tools designed to a clear specification rather than a generic purchase of “sharp scissors.” You can explore MATSUOPRO’s complete pet-grooming shear range to select a tool that fit your exact needs.

Your technique is the most important factor in achieving a smooth blend, while appropriate tooth count and blade geometry for the specific coat type handle the remaining 10-20% that technique alone can’t accomplish. That holds whether you’re weighing the best thinning shears for dogs, comparing curved thinning shears for dogs against a straight, double-sided thinning shears for dogs blade, or deciding between thinning scissors, blending shears, and pet grooming scissors — the underlying mechanism stays the same.
No matter which brand or kit you’re comparing (even popular ones like Kenchii), this guide’s tooth-count-to-coat-type logic still applies. A reliable pair suitable for both dog and cat shears work feels noticeably different from a generic dog grooming shears set — MATSUOPRO’s versatile lineup is built for texturizing as much as thinning and blending, with an offset handle for a natural grip and a smooth glide through thick, furry coats.
See Dog Thinning Shear Specs →
We’re makers of shears, not a grooming salon. Technique claims in this guide come from AKC’s published education standards, the UK CFSG’s 2025 guidelines, and real groomer accounts rather than our own client base, because that’s the honest limit of what a manufacturer can attest to about handling a live dog. Maintenance and steel-geometry guidance is where our own hand-honing process informs the writing directly, reviewed by the MATSUOPRO technical team.
MATSUOPRO is the Mackay Hair Scissors manufacturing brand for professional hairdressing shears, barber scissors, thinning shears, and pet-grooming scissors. We support salons, distributors, academies, grooming brands, and private-label buyers that need factory-direct production with practical material guidance.
Our buying guides are written to help purchasers compare steel grades, handle styles, blade geometry, surface finishes, logo options, packaging, MOQ, and sample validation before placing an OEM or wholesale order. The goal is to make each scissors specification easier to discuss with a real production team.
Factory-direct supply since 2014, with product lines covering professional cutting shears, barber shears, thinning scissors, texturizing scissors, left-handed models, and pet grooming scissors for international B2B customers.
We focus on Japanese 440C, VG10, and ATS-314 steel choices, convex and bevel edge geometry, ergonomic handle balance, tension systems, logo engraving, private-label packaging, and sample-based OEM confirmation.