Get in Touch with Mackayhairscissors Company
We use submitted details to respond to your quote request. Read our Privacy Policy.

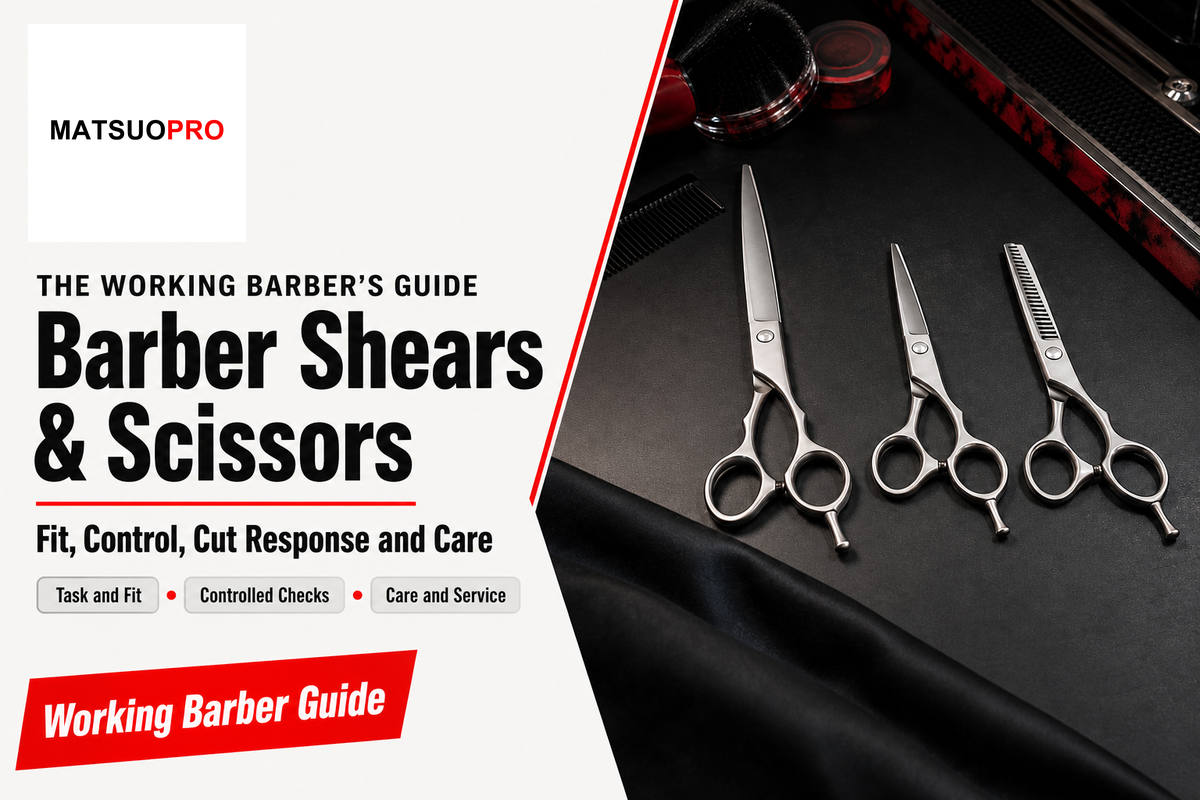
Working Barber Guide · Fit, Control & Care
Barber Shears & Scissors are professional cutting tools used for controlled hair cutting, but their working value depends on fit, model-specific tension, and a predictable cutting response. This guide gives you a repeatable way to assess those variables without turning another article into a product catalog.
Updated August 4, 2026 · Educational guidance for working barbers, shop owners, trainers, and shear-service professionals
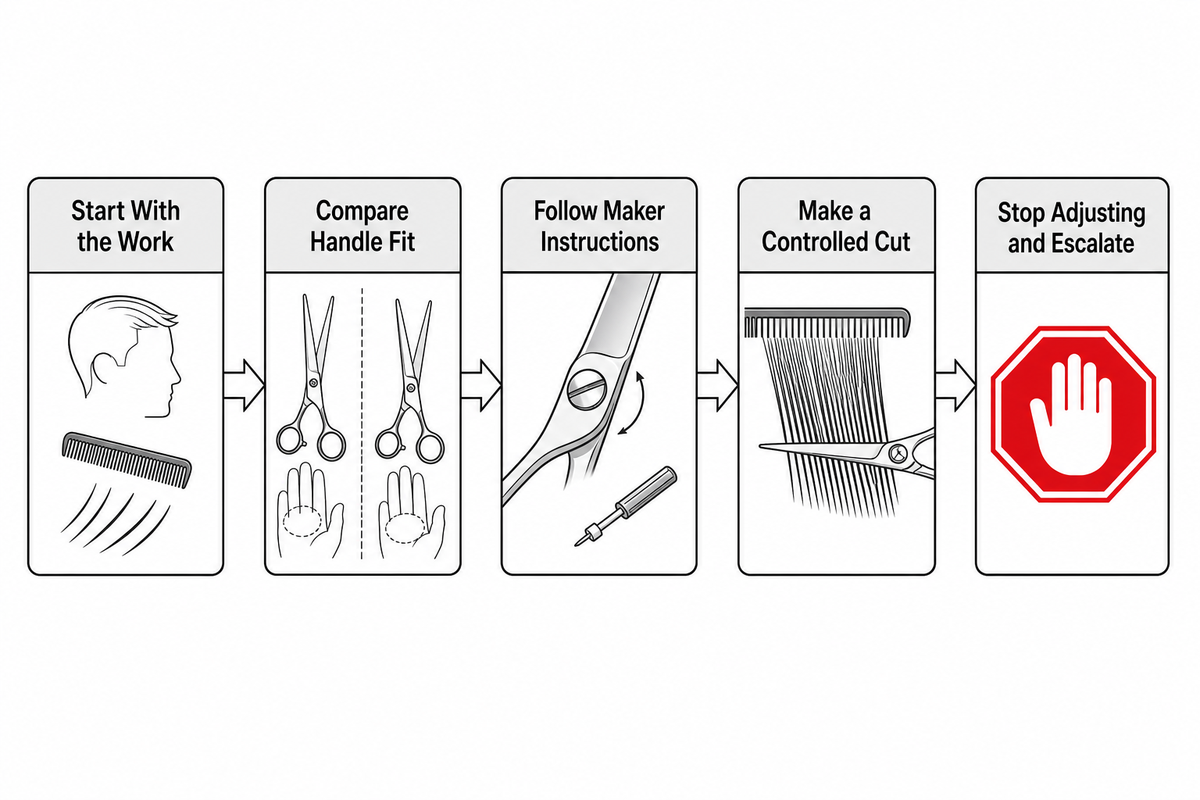
Do not judge a shear from blade length, steel name, price, or a single test alone. Start with the work you perform, compare how the handle fits, follow the manufacturer’s tension instructions, and make a controlled cut. Use the sequence in this guide as a conservative way to isolate observations—not as a validated diagnostic test. If basic, maker-permitted checks do not resolve the symptom, stop adjusting and ask the manufacturer or a qualified service provider to inspect the tool.
For sanitation, there is no universal chemical or application method. Your disinfectant label, the instructions for the exact shear, and the current rule where you work all have to agree.
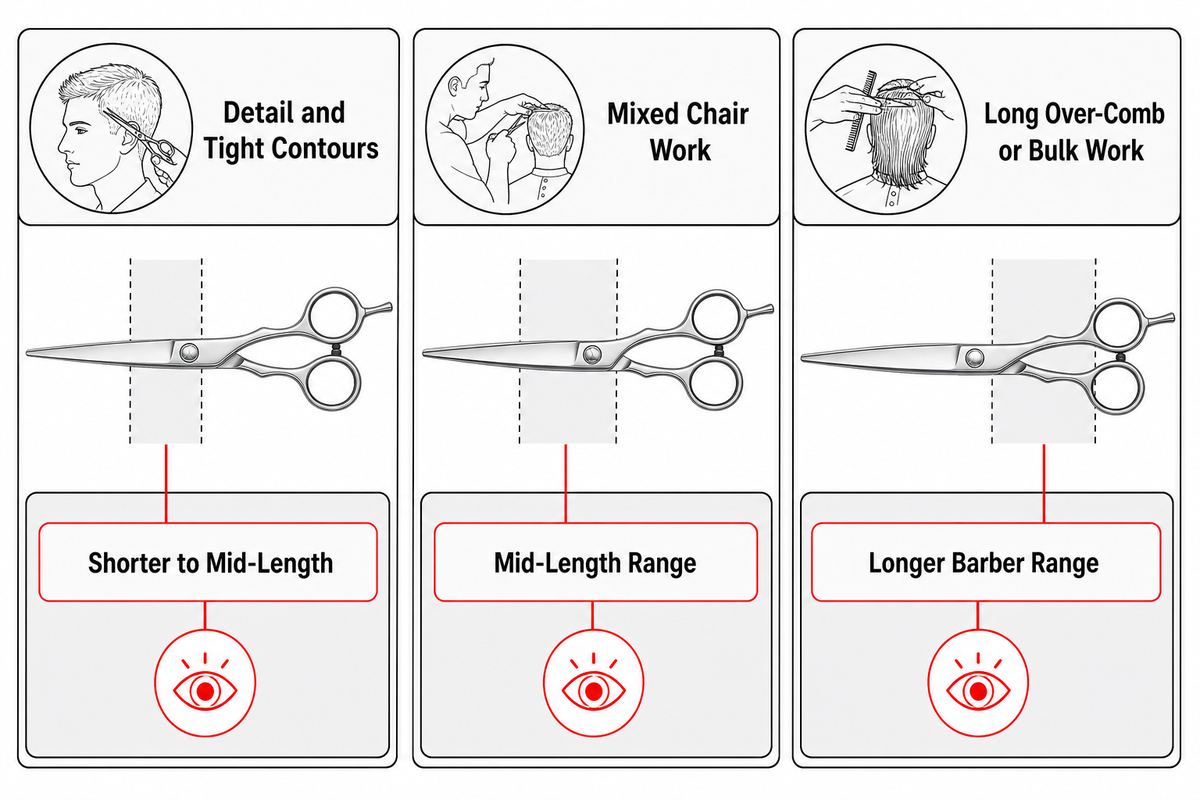
Length recommendations become useful only after the task is named. Tight detail work, palm-over-comb sections, bulk removal, dry refinement, and long scissor-over-comb passes place different demands on the hand and blade. A longer blade changes reach and tip position; a shorter blade changes how much hair can be covered in one opening. Treat those differences as points to compare on the actual model, not as proof that one length is universally better.
The ranges below are practical trial zones, not fixed sizing rules or research-validated cutoffs. Technique, hand shape, handle geometry, and the balance of a specific model can change what feels controllable.
| Dominant work | Useful trial zone | What to watch |
|---|---|---|
| Detail, outline, tight contours | Shorter to mid-length cutting shears | Tip visibility and whether the hand over-grips to stabilize the blade |
| Mixed chair work | Mid-length range | Comfort across both precision and broader sections |
| Long scissor-over-comb or bulk work | Longer barber range | Blade balance, tip control, and whether the wrist stays settled through the pass |
One 6.5-inch model can feel compact while another feels blade-heavy, which is why a barber or stylist should compare balance and usable cutting stroke instead of treating the printed length as the entire fit specification.
For barbers whose day is dominated by long scissor-over-comb work, this separate page on 7-inch barber shears for fades gives the task-specific product context. The point here is simpler: begin with the task, then test the tool. Do not begin with a universal size claim and force your hand to accommodate it.
When one model repeatedly feels awkward across two very different tasks, record the task, stroke, and fit problem before considering another tool. This is a purchasing checklist, not a rule that every mixed schedule requires two pairs.
Terminology varies across shops and sellers: professional hair shears, professional shears, hairdressing shears, professional barber shears, and barber scissors can appear in overlapping contexts. A pair of shears still has to be compared by stated design, intended task, and fit. When a listing uses “thinning scissor” or “hair thinning shears,” verify the toothed design and intended use instead of treating the search term as a complete specification.
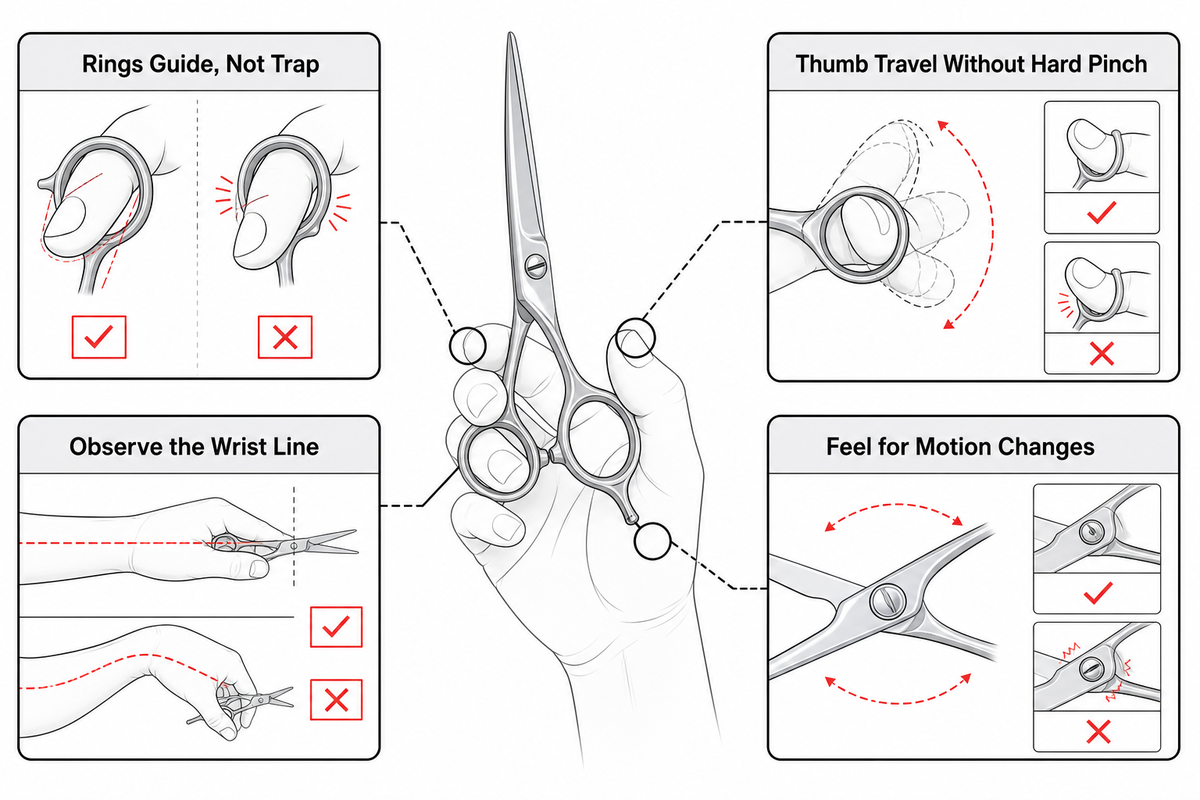
Fit is not the same thing as “the rings feel comfortable.” It includes how the thumb enters and leaves, where the finger rest meets the hand, whether the moving blade can open without a hard pinch, and what the wrist must do to put the blade on the cutting line.
One peer-reviewed study of an ergonomically designed hairdressing scissor reported better wrist-position and discomfort outcomes than a standard scissor in its 44-person test. A broader scoping review of hairdressing work found substantial musculoskeletal complaints and identified repetitive movement, force, elevated arms, and awkward posture as common risks. It also found very little preventive-intervention research. That combination matters: tool geometry can affect comfort and control, but no offset, crane, or swivel handle should be sold as a medical treatment or a guarantee against injury.
A product description may call out an ergonomic handle, ergonomic design, adjustable tension, or right-handed orientation. Treat those as specifications for a barber or hairdresser to test, not proof of comfort or performance.
This is an editorial comparison aid, not a medical screen or a validated ergonomic assessment.
Do not treat a “left,” “right,” or “reversible” handle label as a complete handedness specification. Ask the maker to confirm blade orientation, handle geometry, and intended use, then compare cutting-line visibility and control in your own grip. If that is relevant to your work, review left-handed hair cutting shears as a separate category.
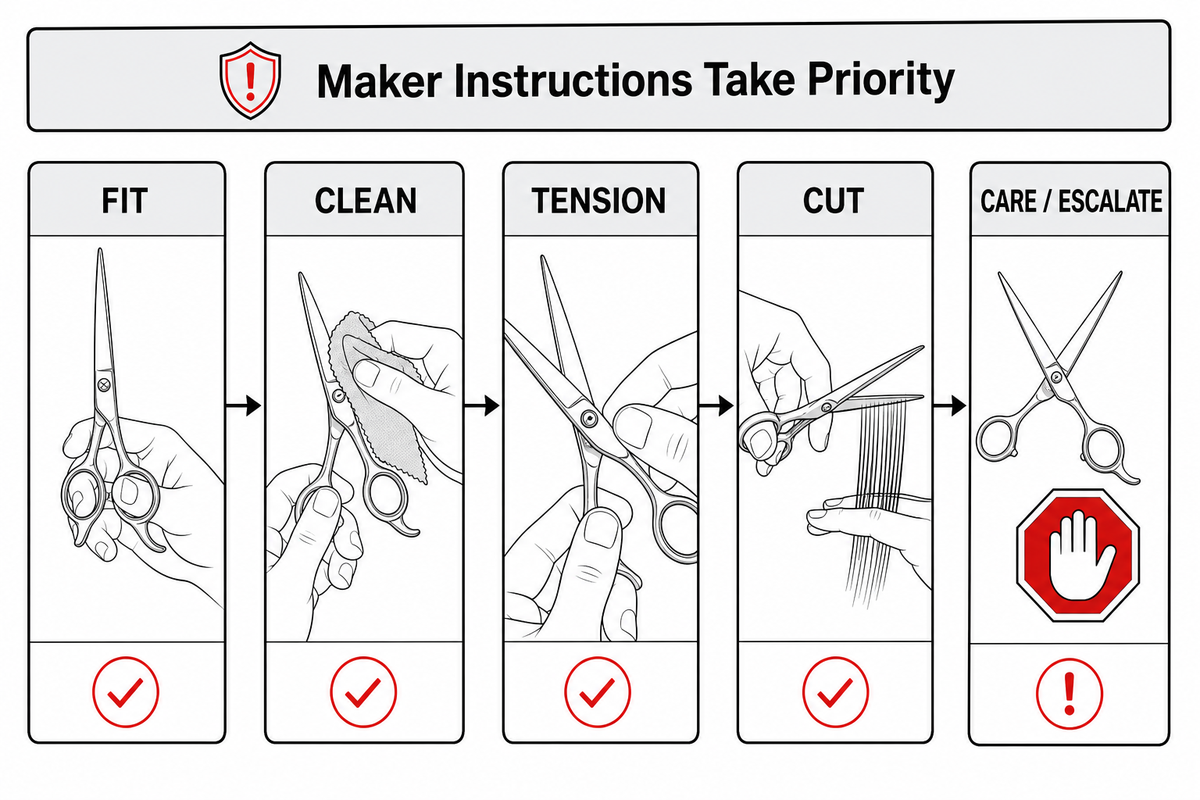
When a shear behaves differently, changing several things at once makes the result hard to interpret. FIT-CUT-CARE is our conservative observation order for recording one change at a time before calling an edge dull. It is an editorial troubleshooting checklist, not a validated diagnostic protocol, and manufacturer instructions take priority.
Some manufacturer guides specify a vertical drop check; that does not create a universal pass angle for every shear. Use the exact maker instructions for the model and pivot system. If no model-specific target is available, do not invent one or keep turning the adjustment screw—record the movement and ask the maker or service provider how that model should be checked.
Before you use unfamiliar hair shears to cut hair during a live service, repeat the controlled check on an appropriate clean sample. The goal is not to stage a dramatic sharpness test; it is to confirm smooth motion and a predictable result without hiding a mechanical problem inside technique changes.
Stop the test if you feel grinding, see the blades collide, find a nick at one repeatable point, notice side play at the pivot, or cannot move the adjustment without force. Those are service or manufacturer questions, not invitations to keep turning the screw.
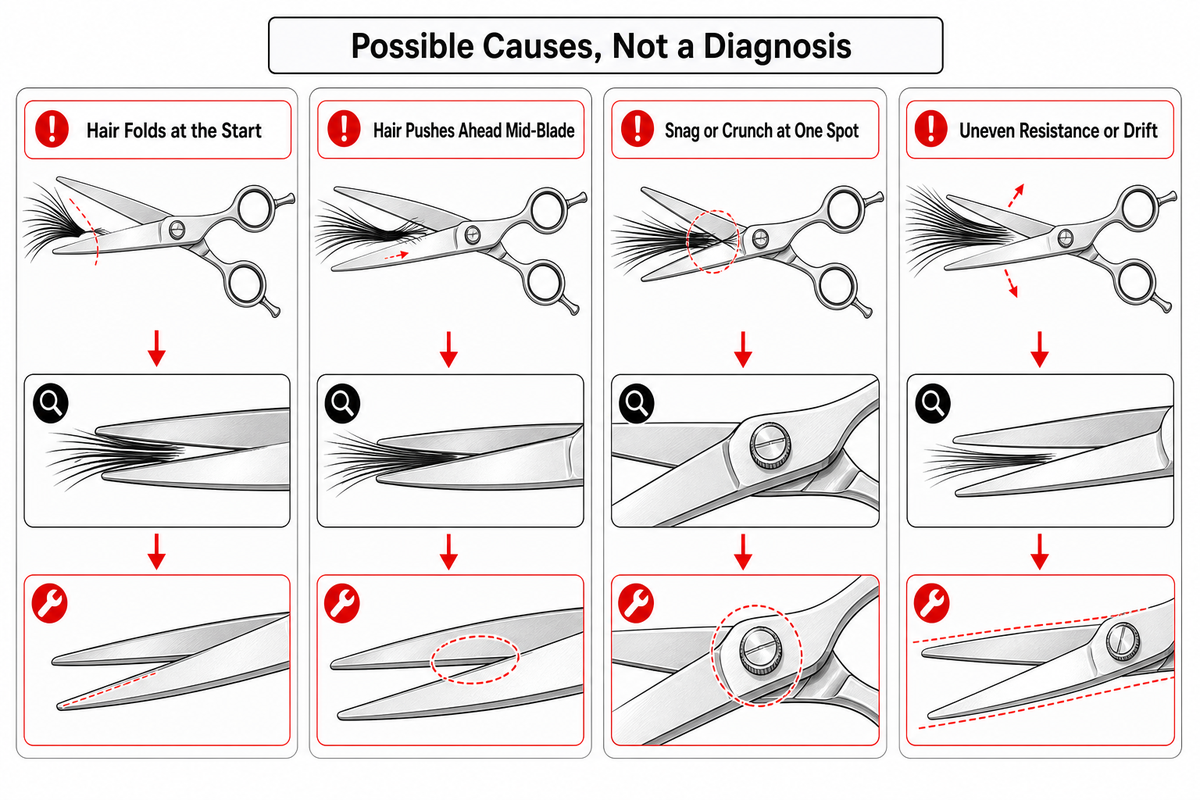
A cutting symptom is an observation, not a diagnosis. Residue, tension, edge condition, pivot condition, technique, and the hair sample may produce similar sensations. The map below is an editorial triage aid: it suggests low-risk checks and stop points, but its “possible explanations” are hypotheses for inspection, not confirmed causes.
| Signal | First low-risk check | Possible causes, not a diagnosis | Service trigger |
|---|---|---|---|
| Hair folds at the start | Clean, dry, then verify the model’s tension baseline | Loose tension, residue, worn entry zone, oversized section | Folding persists on a clean controlled sample |
| Hair pushes ahead mid-blade | Repeat with the same section size and hair condition | Edge wear, unsuitable edge behavior for the technique, tension, product load | Same mid-blade push after cleaning and baseline reset |
| Snag or crunch at one spot | Stop and inspect that blade location under good light | Nick, burr, local damage, blade contact or contamination | Repeatable point defect or visible damage |
| Uneven resistance or drift | Check pivot play, blade cleanliness, grip, and whether the symptom follows the same stroke | Misalignment, pivot wear, inconsistent thumb pressure, debris, balance mismatch | Wobble, visible gap, blade collision, or persistent drift |
Before service, write down the hair condition, where along the blade the symptom begins, and whether it repeats after maker-permitted cleaning and baseline checks. This gives the service provider observations to inspect without asserting that the edge is the cause.
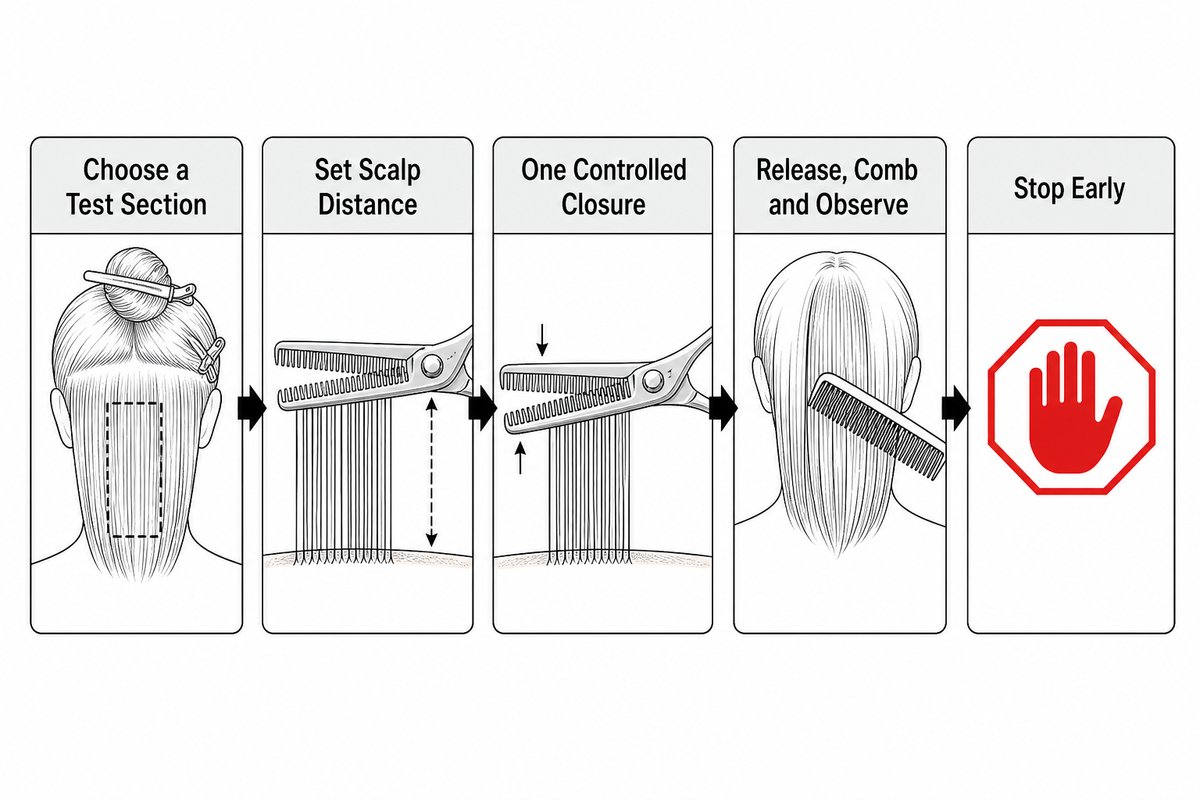
Tooth count describes one feature of a tool, but manufacturer and trade guidance does not support turning tooth count alone into a universal removal percentage. Product-specific percentage claims should remain attached to the stated model, tooth design, test method, hair condition, section size, and technique behind the claim.
For training or a consented test section, the following one-pass sequence is our conservative editorial checklist. It has not been validated as a universal safety protocol:
For category-level product context, compare professional thinning shears with purpose-built texturizing shears. Use those pages to understand the available tool families; use the conservative test above to decide how a particular pair behaves in your hand.
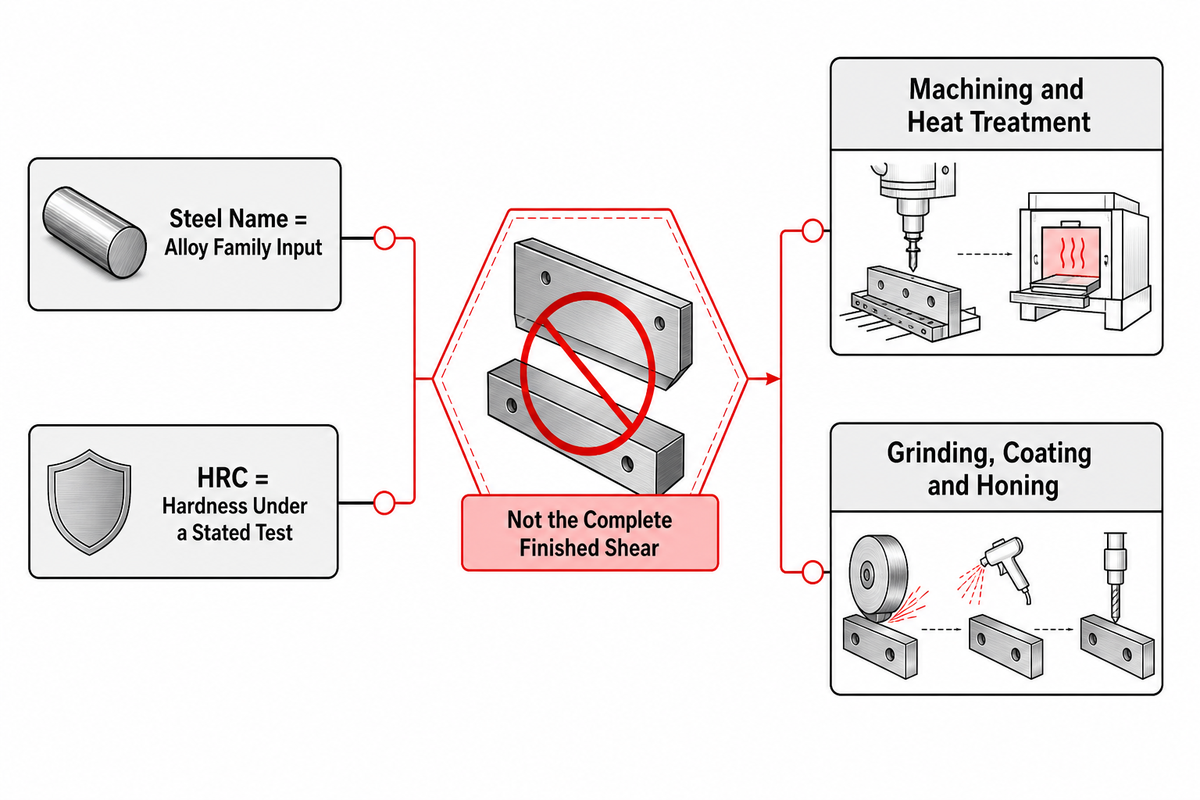
Steel names can identify an alloy family, and an HRC result can describe hardness under a stated test. Neither specification describes the complete finished shear. Heat treatment, grinding, honing, alignment, pivot assembly, coating, and maintenance are separate variables that should be checked in manufacturing records or model documentation rather than inferred from the steel label alone.
MATSUOPRO’s manufacturing and quality-control overview describes CNC machining, vacuum and cryogenic heat treatment, precision grinding, PVD coating, and hand honing as separate production steps. That is first-party process context—not independent proof of superiority—but it demonstrates why a grade or hardness number cannot stand in for the whole production chain.
If you need the metallurgy detail, use the dedicated 440C vs VG10 comparison and the explanation of how HRC hardness is measured. This guide’s job is different: keep the label in proportion to fit, cutting response, serviceability, and the care your shop can actually maintain.
Apply the same restraint to price. A price tag does not by itself establish fit, cutting response, finishing quality, or serviceability. Compare those attributes directly and ask the seller for the model-specific evidence you need; do not guess which hidden cost component explains the price.
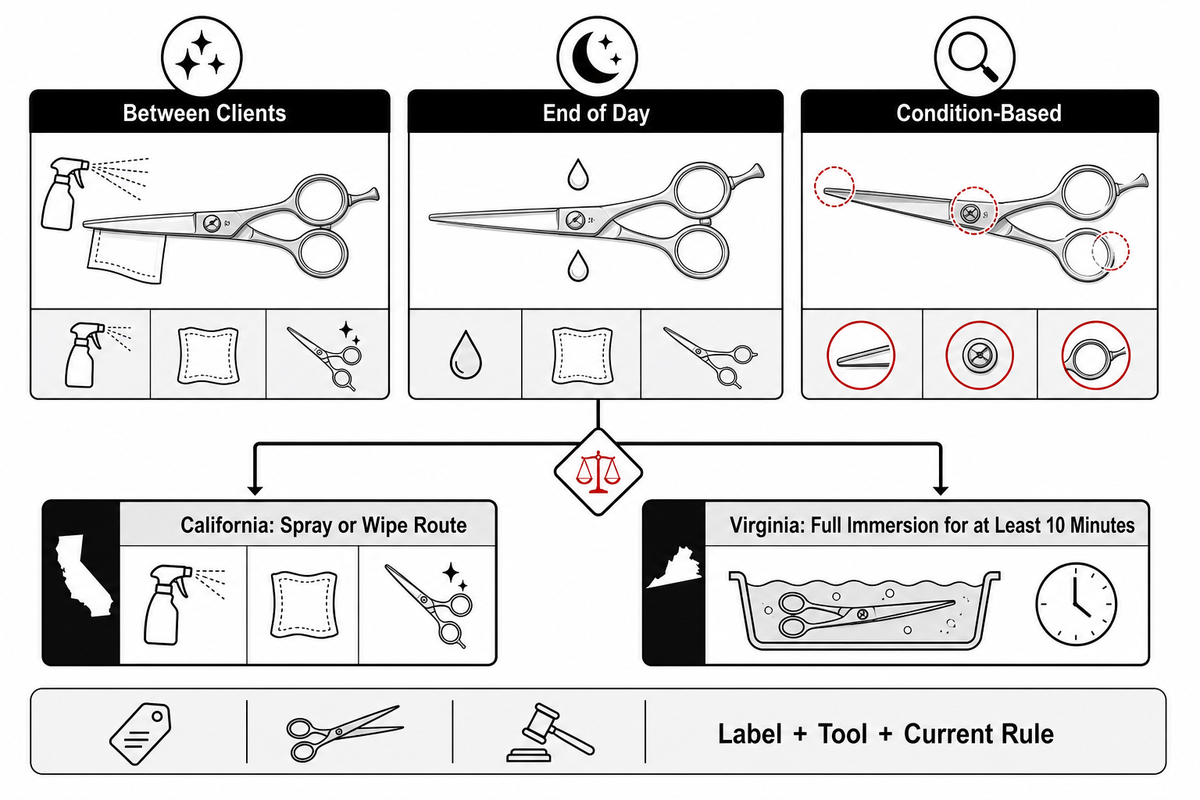
Specifications describe a tool; care instructions govern what happens to it in use. Calendar-only maintenance cannot account for the exact tool, instructions, or observed condition. The table below separates regulatory sanitation duties from optional maker-permitted care and condition-based inspection. It is an editorial organizing framework, not a replacement for the disinfectant label, product manual, workplace procedure, or controlling rule.
| Interval | Purpose | Actions | Do not assume |
|---|---|---|---|
| Between clients | Sanitation and contamination control | Remove debris, clean, then disinfect using the exact label, tool instructions, and controlling rule | That one spray, wipe, soak, concentration, or contact time works everywhere |
| End of day | Dryness, smooth movement, protected storage | Inspect the pivot and blades, dry completely, lubricate only as the maker permits, and store clean and protected | That more oil, tighter tension, or a leather pouch is always compatible with sanitation rules |
| Condition-based | Adjustment, inspection, or professional service | Use repeatable symptoms, visible damage, pivot play, or a failed controlled test to trigger the next action | That every shear needs sharpening on the same number of weeks or haircuts |
Why the local-rule branch matters
California’s current rule gives shears a specific sequence: remove visible debris, clean with soap or detergent and water, then spray or wipe with an EPA-registered bactericidal, fungicidal, and virucidal disinfectant according to manufacturer instructions. It also restricts storage in holders that cannot be disinfected.
Virginia’s current rule is materially different: hard, nonporous, multiuse instruments including scissors are washed, rinsed, dried, fully immersed in wet disinfectant for at least 10 minutes, then rinsed, dried, and stored clean. These are jurisdictional examples, not two methods from which any barber may freely choose.
“Shears shall be disinfected according to the following sequential procedures.”
The operating rule is the three-instruction intersection: the disinfectant label + the exact shear-model guidance + the current regulation or workplace rule. Government health and safety guidance also stresses product concentration, contact time, expiry, and material compatibility. If those instructions conflict, pause and resolve the conflict with the manufacturer, disinfectant supplier, or relevant authority. Do not improvise a mixed chemical or shorten a required contact time.
A service note can separate observation from assumption. Instead of writing only “dull,” record the result of the same controlled check you used chairside:
Ask what the provider will inspect, how the finished tool will be tested, and whether any metal or part will be removed or replaced. The record below is a communication template, not a diagnostic standard; the provider or manufacturer remains responsible for inspecting the mechanism and recommending the appropriate service.
| Observation type | What to record | Why it changes the next check | Limitation |
|---|---|---|---|
| Tool identity | Maker, model, pivot, handedness | Finds the intended adjustment and edge information | A model name alone does not describe current condition |
| Dominant task | Detail, over-comb, dry work, texture | Connects the symptom to the working stroke | One task cannot represent a mixed schedule |
| Hair condition | Wet, dry, clean, or product-loaded | Separates contamination and technique variables | A single client is not a controlled sample |
| Symptom | Fold, push, snag, drift, noise, resistance | Directs inspection without declaring a cause | Different causes can feel similar |
| Blade location | Start, middle, tip, or one point | Helps isolate local damage from general behavior | Location does not prove edge damage |
| Repeatability | Same sample and stroke, repeated result | Distinguishes a pattern from a one-off cut | Do not repeat a test that risks more damage |
| Checks completed | Clean, dry, oil if allowed, baseline tension | Prevents duplicate or unnecessary adjustments | Only perform maker-permitted checks |
| Damage history | Drop, impact, forced adjustment, corrosion | Raises alignment and pivot questions | Absence of a remembered event does not exclude damage |
| Process change | New disinfectant, contact time, storage, or service | Identifies what changed before the symptom | Correlation is a lead, not proof of cause |
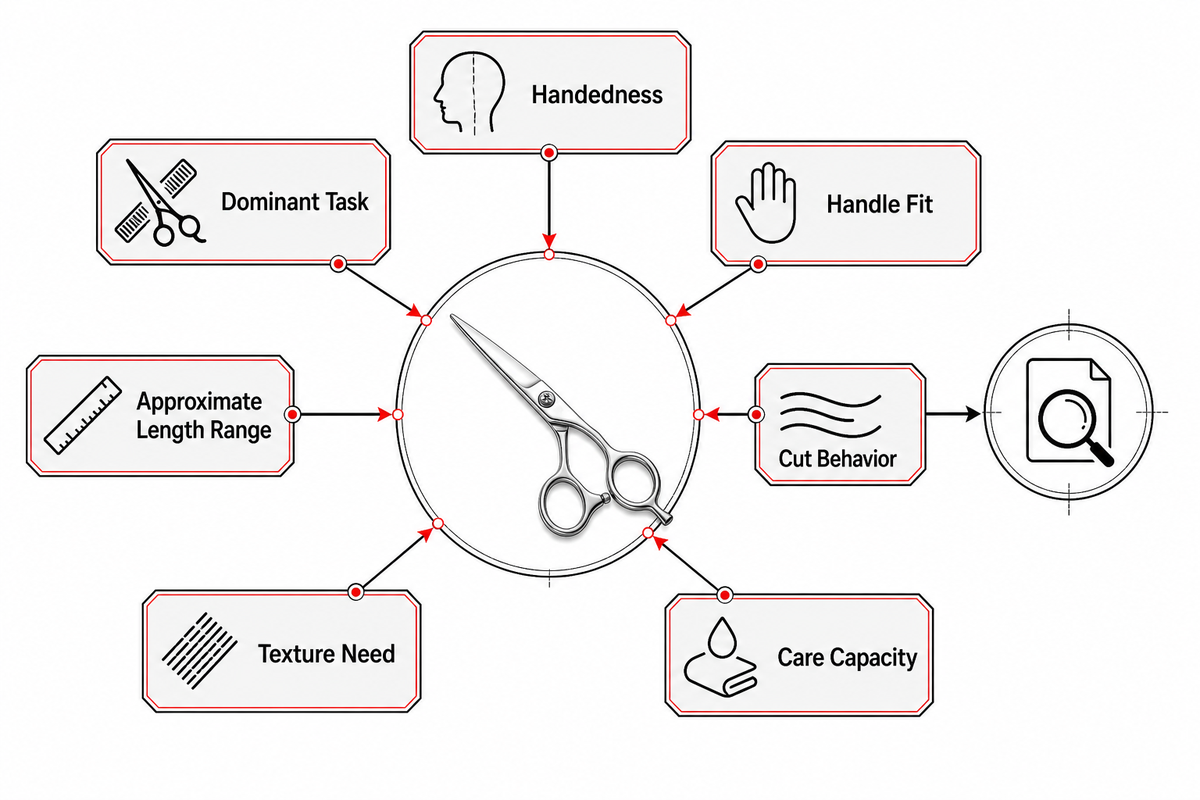
At this point, you should have a record, not just a preference. It gives a supplier or service provider a clearer description of the work the shear must perform and the specific observations you want them to address during a model comparison or inspection.
With those seven inputs recorded, you can compare barber shears and scissors by specification and ask focused questions about a model’s intended task, dimensions, construction, care instructions, and service route.
Include the seven items above: task, approximate length range, handedness, handle fit, cut behavior, texture need, and care capacity. Add the hair conditions and working stroke used during your comparison. MATSUOPRO can then respond to a defined application and explain which model specifications are relevant.
There’s no single best size. Start with the dominant task and the range you can control without changing wrist position or over-gripping. Use a longer trial zone for broad scissor-over-comb work and a shorter one for tight detail, then confirm with the actual model. Compare balance and usable stroke as well as the number printed on the shear.
Do not apply an angle from a generic guide to every shear. Use the exact maker instructions for the model and pivot system. If no target is available, record the movement and ask the maker or service provider before adjusting. Stop if the blades collide, the pivot has side play, or adjustment requires force.
There is no universal interval in the sources reviewed for this guide. Follow the manufacturer’s schedule when one is provided; otherwise use condition-based observations by documenting repeatable changes after maker-permitted cleaning and baseline checks, visible damage, and service history, then ask a qualified provider to inspect the tool before recommending sharpening.
Only if the controlling rule, disinfectant label, and exact tool instructions allow that method. California and Virginia prescribe different procedures.
No. Price alone does not prove fit or cutting response for your hand and work. Compare the seven-point record in this guide, then ask for model-specific details about the edge, pivot, intended care, and service route. A higher price does not substitute for those answers.
MATSUOPRO is the Mackay Hair Scissors manufacturing brand for professional hairdressing shears, barber scissors, thinning shears, and pet-grooming scissors. We support salons, distributors, academies, grooming brands, and private-label buyers that need factory-direct production with practical material guidance.
Our buying guides are written to help purchasers compare steel grades, handle styles, blade geometry, surface finishes, logo options, packaging, MOQ, and sample validation before placing an OEM or wholesale order. The goal is to make each scissors specification easier to discuss with a real production team.
Factory-direct supply since 2014, with product lines covering professional cutting shears, barber shears, thinning scissors, texturizing scissors, left-handed models, and pet grooming scissors for international B2B customers.
We focus on Japanese 440C, VG10, and ATS-314 steel choices, convex and bevel edge geometry, ergonomic handle balance, tension systems, logo engraving, private-label packaging, and sample-based OEM confirmation.