Get in Touch with Mackayhairscissors Company
We use submitted details to respond to your quote request. Read our Privacy Policy.

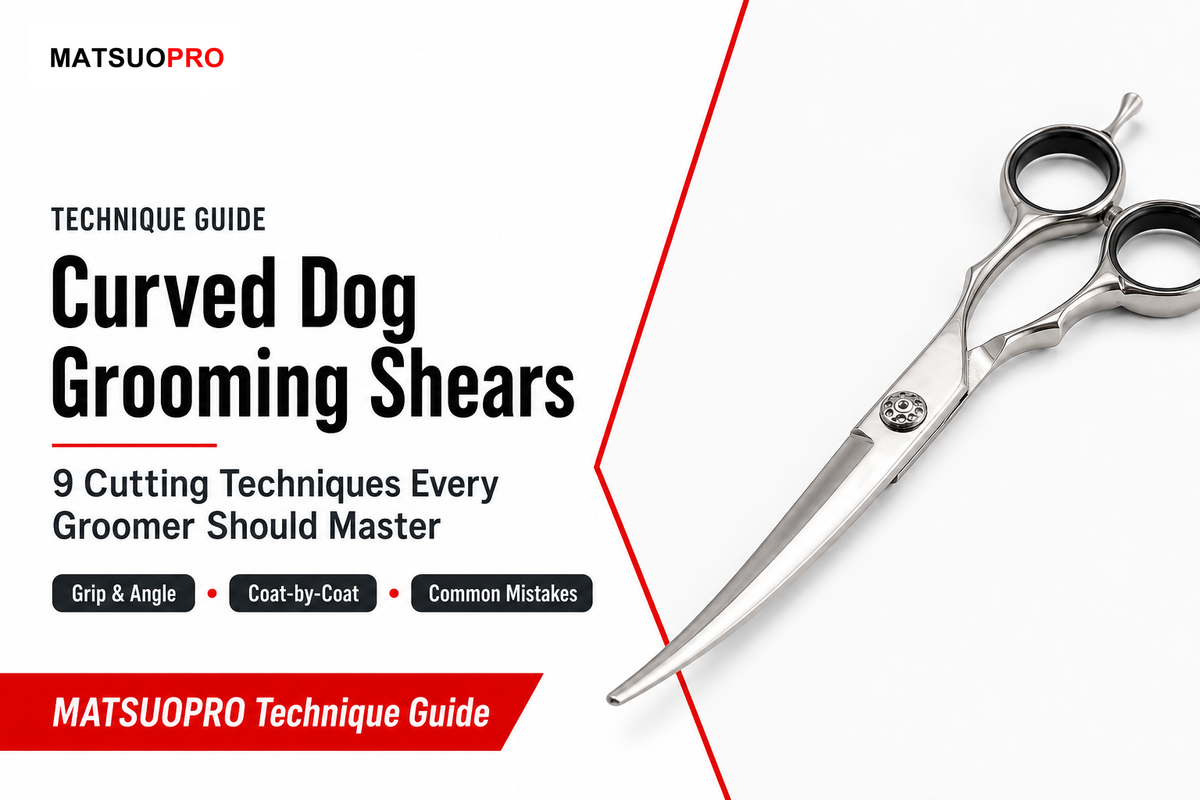
Curved dog grooming shears are scissors with an arced blade profile, built to follow the rounded lines of a dog’s body — topknots, paws, tucked bellies — in one continuous stroke instead of several short straight ones. Owning a pair and knowing how to move them across a squirming, curly-coated client are two different skills: the blade geometry does half the job, and grip, angle, and stroke pattern do the rest.
Looking for spec comparisons, steel grades, or a model to buy instead? See our curved dog grooming shears lineup for that.
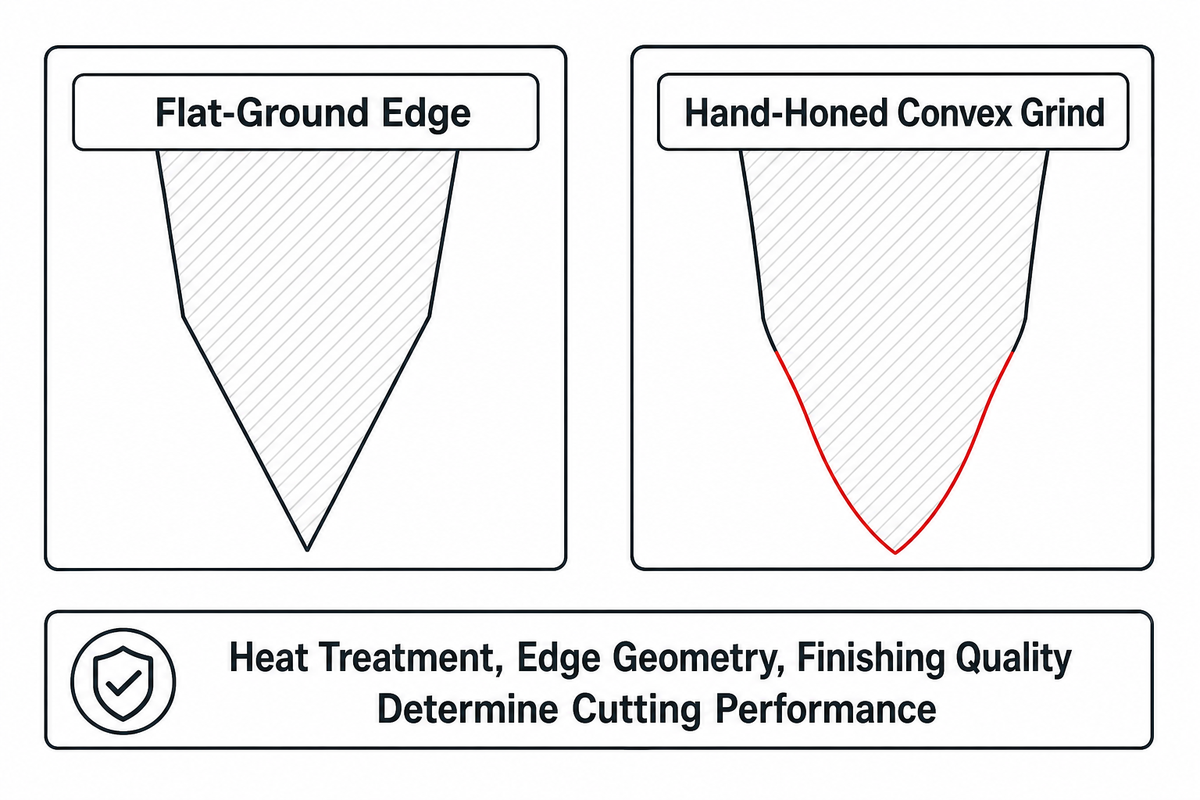
Curved shears aren’t straight shears bent for style: the blade follows an arc for its full length, and that arc lets the edge stay in contact with a curving body line through one continuous motion instead of a series of short straight taps. Blade curvature alone doesn’t decide cut quality, though.
Heat treatment, edge geometry, and finishing quality determine cutting performance and edge retention at least as much as the steel-grade name printed on the box, and the same steel grade can perform very differently depending on how it was hardened and honed. A well-forged, well-honed curved blade in a mid-tier steel will often outcut a poorly finished blade in a premium steel.
Most professional-grade curved shears, including high quality Japanese stainless steel like 440C, reach that edge through a hand-honed convex grind — a rounded bevel that holds a genuinely sharp, durable, long-lasting edge longer than a flat-ground one. The craft of honing that steel to a precise curved design is part of what separates a well-made shear from a budget import: heat treatment and honing quality do as much to determine how a given steel performs as the steel-grade name printed on the box, so see our steel guide for a full grade-by-grade comparison. Comfort and control at the handle — balance, a lightweight feel on well-built lightweight shears, screws and tension that hold rather than drift — matter just as much for consistent results. This is also why professional grooming education standards treat tool selection as its own competency separate from coat-handling skill on any professional shear — a groomer can execute perfect technique and still get an inconsistent result from a poorly maintained tool. The rest of this guide assumes you already have a shear like that and focuses entirely on what you do with it.
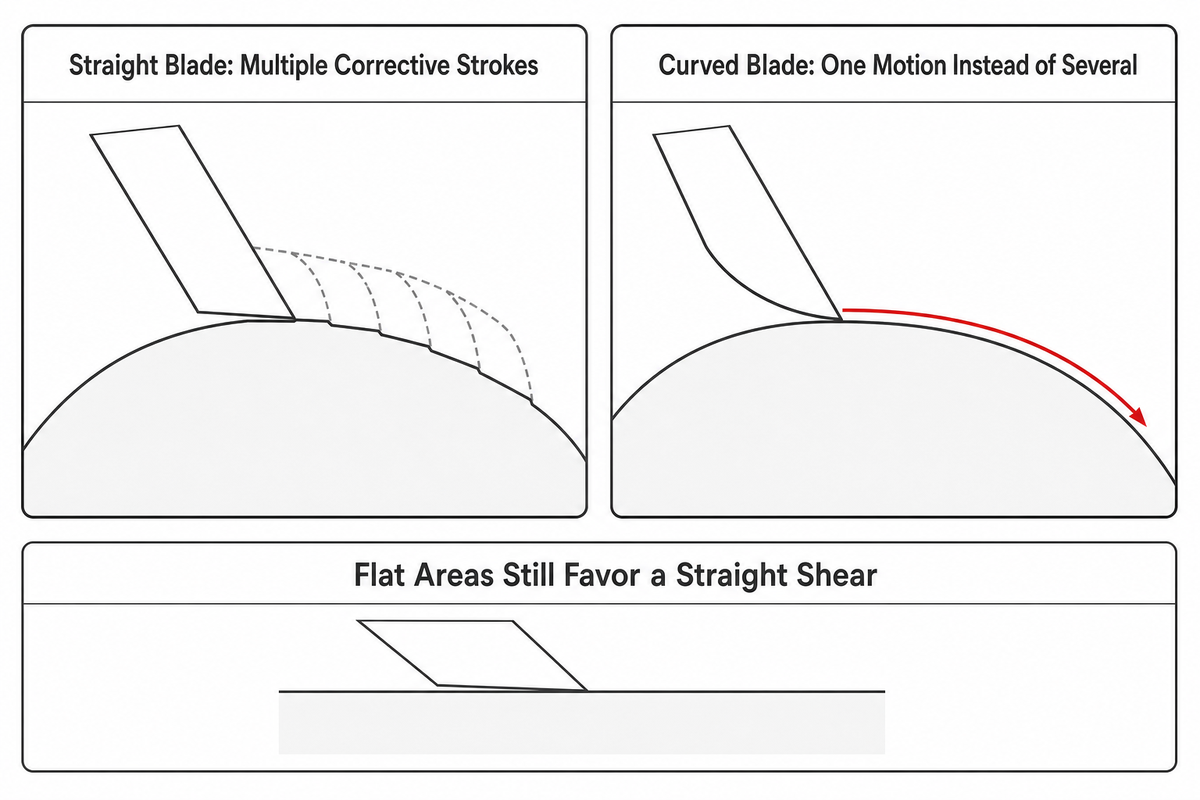
Fewer passes get the job done with a curved blade than with a straight one on a rounded contour, because the blade’s own arc approximates the body line it’s cutting instead of chasing it in short straight segments. That’s the core mechanical logic behind every curved-shear technique in this guide — call it the arc-follows-form principle: match the tool’s curve to the curve you’re shaping, and the cut follows the form with one motion instead of several corrective ones.
Think of it as a matter of geometry and precision, not magic. Approximating a rounded topknot or a paw bevel with a straight edge takes repeated repositioning to avoid leaving flat facets — small straight segments where a smooth curve should be. Match the edge’s radius to the body line’s radius instead, and that stair-stepping disappears in one stroke. This is reasoning any groomer can verify by comparing a single curved pass to the multiple straight passes needed to fake the same line — it isn’t a claim resting on a lab study, just the same geometry that makes a curved cookie cutter outline a circle faster than a straight-edge ruler.
Where this breaks down: a curved blade isn’t automatically the better tool. Picture a Boxer’s back, a terrier’s straight-line pattern, or any bulk-removal pass before detailing begins: those flat areas are where a straight shear holds a truer line with less drift, and professionals who own both types reach for the straight shear first there. These two blade types aren’t interchangeable; they’re complementary, and picking the wrong one for a flat surface produces the same choppy, uneven result curved shears are supposed to prevent. This is the same body-area-conditional logic behind Australia’s ACMGRM304 vocational competency standard for professional groomers, which requires technique selection to follow the body zone and coat type rather than a single blade profile applied everywhere.
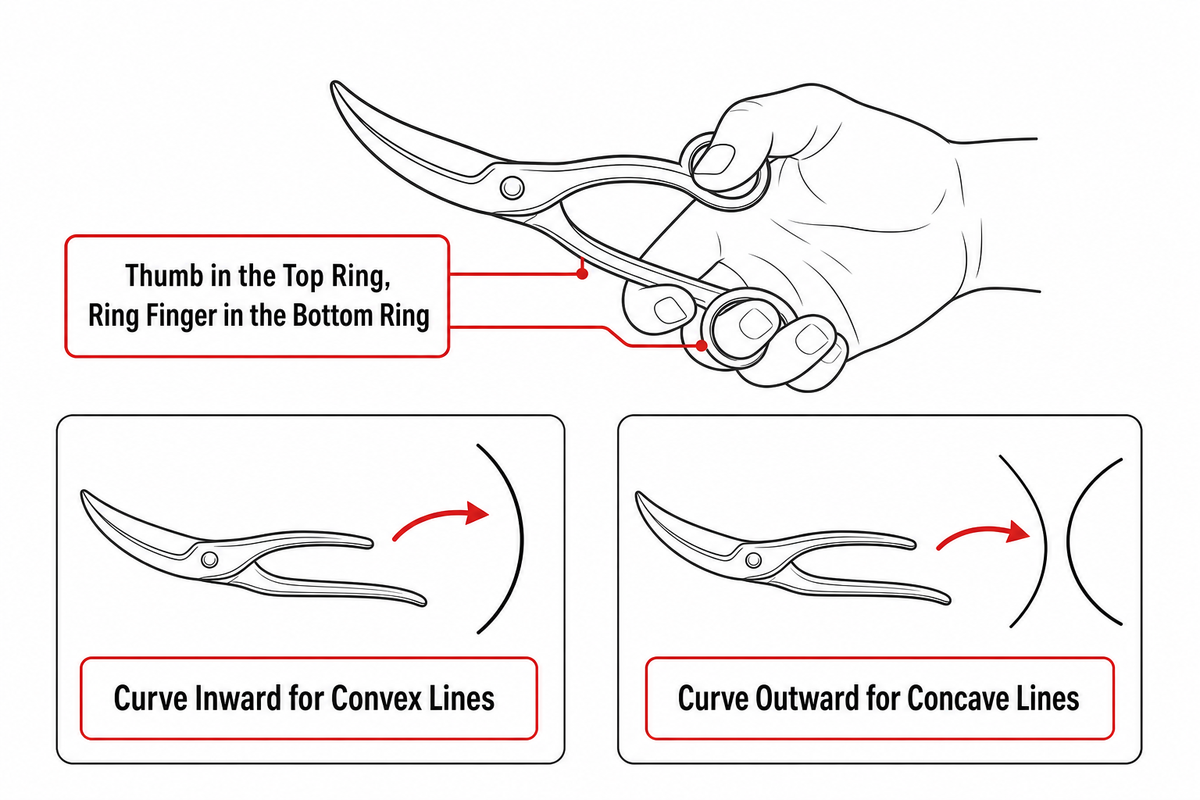
Correct grip on a curved shear starts with a neutral wrist, not a death grip on the handle. Rest your thumb in the top ring and your ring finger in the bottom ring, letting your index and middle fingers stabilize the shear from outside the handle rather than curling into it. The goal is to keep the handles close to perpendicular to your wrist through the stroke — a bent-wrist grip is the single fastest way to turn a quick finishing pass into hand fatigue by the third or fourth dog of the day.
Cutting motion itself should be small and controlled: short openings and closings of the blade rather than one wide scissor sweep, with each cut overlapping the previous one by roughly half the blade’s length so you never leave a visible step between passes. Work systematically around a body zone — bottom to top on a leg, center-out on a topknot — instead of jumping between areas, which is what produces the uneven, patchy look clients notice first.
Orientation matters as much as grip. The curve should face the direction of the shape you’re building: turn it inward toward the dog’s body when you’re rounding a convex line like a topknot or a shoulder, and flip it so the curve points outward when you’re working a concave line, such as blending under a tuck-up, so the tips lead into the coat instead of digging toward the skin. Getting this backward is one of the most common sources of an unexpectedly gouged or uneven line, covered further in the mistakes section below.
Handle ergonomics gets plenty of attention elsewhere; the repetitive-strain side of scissor work gets far less. OSHA’s general guidance on manual scissor-station work — written for sewing and manufacturing settings, but describing the same tool and the same joints — flags awkward wrist postures, repeated grip force, and contact stress as the drivers of hand and wrist strain from repetitive cutting. In practice, scissoring five or six dogs a day means doing that same repetitive motion at volume; keeping the wrist neutral and taking short breaks between dogs isn’t optional technique polish, it’s the difference between a comfortable career and an early case of hand fatigue, because it stacks two of the risk factors OSHA names above — awkward wrist posture and sustained grip force — into the same repeated motion.
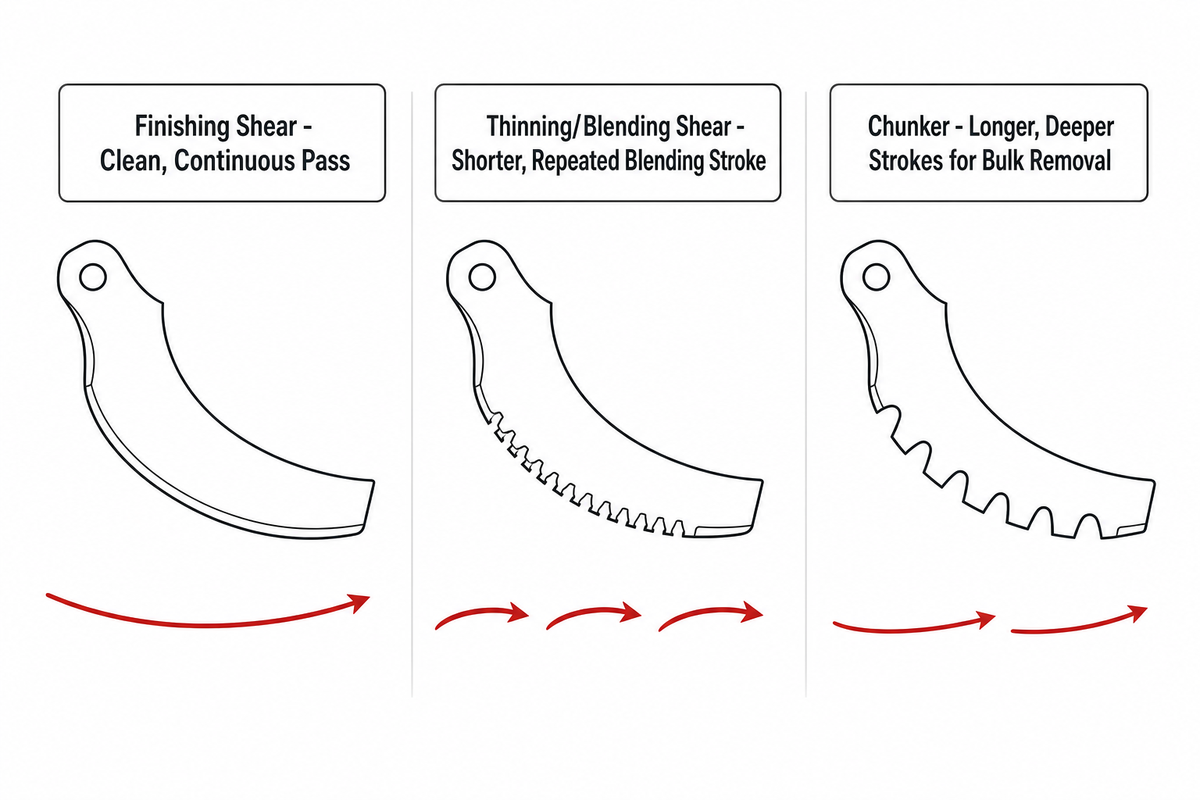
“Curved shear” describes a blade profile, not a single tool — and the motion changes depending on which curved-blade type is in your hand. A curved finishing shear (solid blade, no teeth) is used for the arc-scoop stroke described above: a clean, continuous pass that sets the final line, with a subtle rather than dramatic curve design for most general finishing work. Curved thinning or blending shears (partial teeth on one or both blades) use a shorter, repeated blending stroke instead — small bites taken at an angle to the coat rather than perpendicular, feathering the transition between a longer and a shorter section instead of setting a hard edge. Chunkers with a curved profile (fewer, wider-spaced teeth, sometimes called chunker shears or curved chunker shears) handle bulk removal before either of the other two tools comes out, using longer, deeper strokes that remove volume fast, always followed by a finishing or blending pass to clean up the result.
Which of these three tools a given dog even needs also depends on coat and grooming style, not the tool alone — professional grooming education standards call out tool selection by purpose and coat type as its own competency, and some breed styles call for only one or two of the three profiles rather than the full set. Reaching for the wrong motion on the wrong tool is a common beginner mistake within whichever profiles you do use — using a full arc-scoop finishing stroke with a chunker leaves an uneven, ragged edge, because the widely spaced teeth were never meant to set a clean final line. Match the stroke to the tool — and match the tool to the grooming needs of the coat in front of you: scoop with the finishing shear, feather with the blender, and remove volume with the chunker, in that order. Dependable curved grooming shears with a removable finger rest also help here, since swapping grip position between tool changes costs less time than fighting a fixed handle mid-groom.
Tooth count and removal rate move together across a shear line, which is why the three tools land in a rough order rather than an arbitrary one: fewer, wider-spaced teeth remove more hair in a single pass than a dense row of fine teeth does. On a dense double coat that needs real bulk gone before any shaping starts, a groomer typically opens with the chunker to cut that volume down fast, then switches to a blending shear for the transition zones around the topknot and legs where an aggressive chunker pass would leave visible gaps. For a closer look at how tooth count changes the cut across a full shear line, see our guide to thinning shears for dogs.
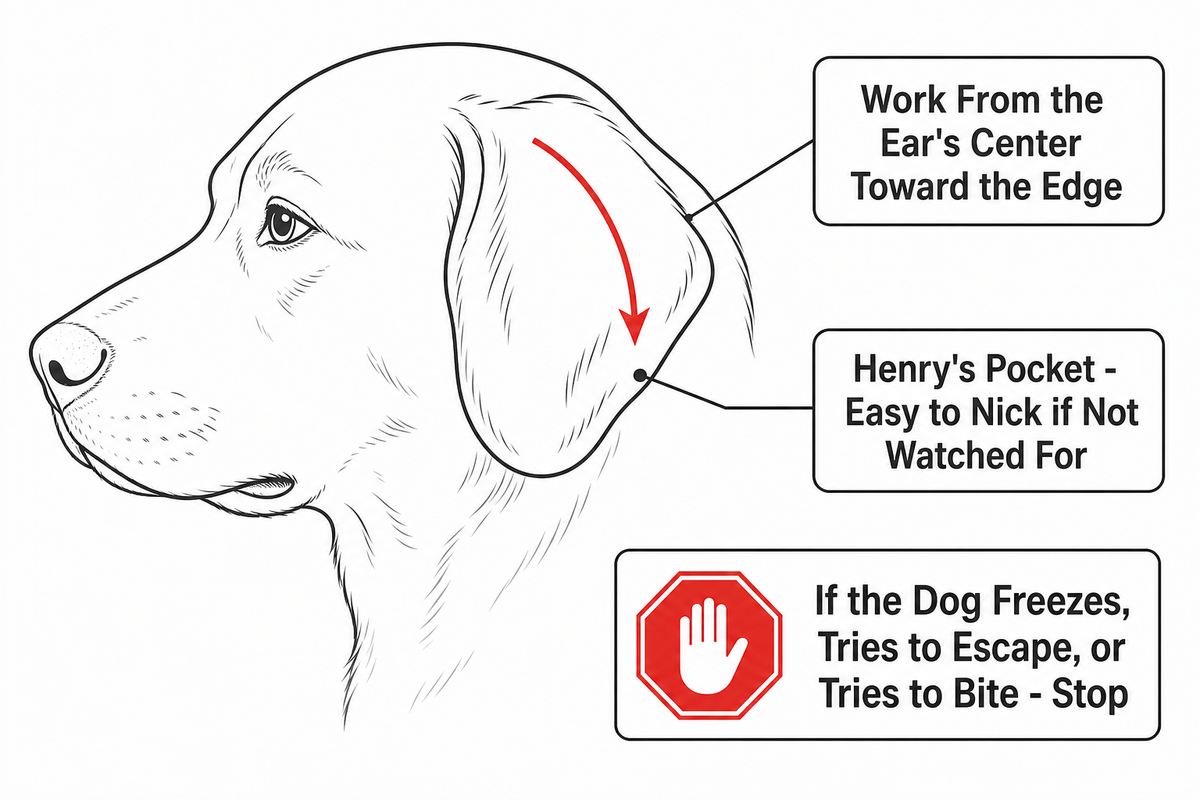
Working near a dog’s eyes and ears with an open blade calls for slower, smaller motions and a genuine landmark check, not just general caution. Work from the ear’s center toward the edge, keeping the scissor tips pointed toward the tip of the ear as you go — and watch for what groomers commonly call “Henry’s Pocket,” a fold of skin near the bottom outside edge of the ear that’s easy to nick if you aren’t deliberately watching for it. Around the eyes, hold the surrounding fur away with a comb or your free hand and take smaller cuts than feel necessary; a rounded, ball-tip curved shear designed for facial work reduces the consequences of an unexpected head movement, though no tool replaces watching the dog rather than only the blade.
Ball-tip and curved shears reduce risk around sensitive areas — it’s a technique aid, not a medical or injury-prevention device, and it doesn’t substitute for a calm, well-restrained dog and a groomer’s own attention.
Movement is the real variable safety technique has to plan around, and Purdue University’s Canine Welfare Science program sets the same stopping threshold for professionals that it recommends to owners at home:
“If your dog freezes, tries to escape, tries to bite, or otherwise seems stressed out, stop and ask your attending veterinarian for help.”
— Purdue University Canine Welfare Science, Brushing and Coat Care
In practice that means letting an anxious dog sniff the open (closed-blade) shear before you start, holding long chin or face hair to stabilize the head while you work near it, and keeping strokes short enough that a sudden flinch moves the blade a fraction of an inch instead of an inch.
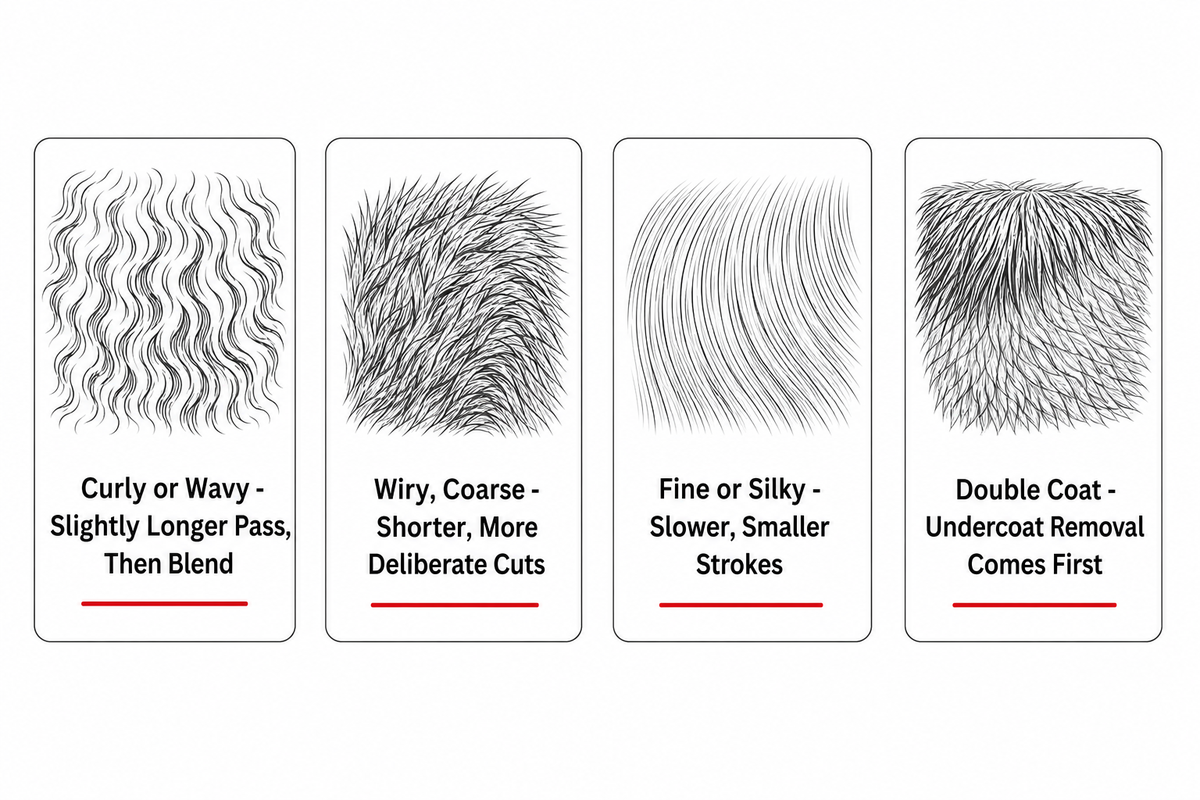
The same curved-shear motion doesn’t land the same way on every coat. Purdue’s coat-care guidance groups coats into categories — long, medium, short, double, curly, wire, fine/silky, and hairless — and each behaves differently under a blade, not just under a brush.
Curly or wavy coats (Poodles, Bichons, doodles) spring back after cutting, so a slightly longer initial pass followed by a lighter blending pass reads more accurately once the curl relaxes than trying to nail the final length in one stroke. Wiry, coarse coats meet more resistance per stroke, and shorter, more deliberate cuts hold a cleaner line than long sweeping ones. Fine or silky coats tangle easily and show every stray hair, which rewards slower, smaller strokes and more frequent combing between passes. Double coats need a different sequencing entirely: the American Kennel Club’s professional grooming education standards call for removing the undercoat first through carding and undercoat raking, especially on double-coated breeds, and reaching for a curved shear before that step means fighting through a coat that isn’t ready to be shaped — the shear’s job on a double coat is the finishing pass after de-shedding, not bulk removal.
| Coat type | Technique adjustment | Why |
|---|---|---|
| Tight curly | Cut slightly long, blend after curl relaxes | Curl springs back after the cut |
| Loose wavy | Comb straight before each pass | Waves hide uneven length until combed flat |
| Wiry / coarse | Shorter, deliberate strokes | Higher resistance per stroke than soft coats |
| Fine / silky | Smaller cuts, comb between passes | Tangles easily, every stray hair shows |
| Double coat (finishing stage) | Curved shear only after carding/raking removes undercoat | Shear is a finishing tool here, not a de-shedding tool |
| Short/smooth | Minimal scissor work, mostly clipper-set | Little length to shape with a blade |
| Corded | Trim cord ends only, never mid-cord | Cutting mid-cord unravels the whole section |
| Thick undercoat, thinner topcoat | Blend topcoat length over de-shed undercoat | Mismatched density shows as an uneven silhouette |
| Matted / tangled | Do not scissor through mats — clip out first | Cutting into a mat risks nicking trapped skin |
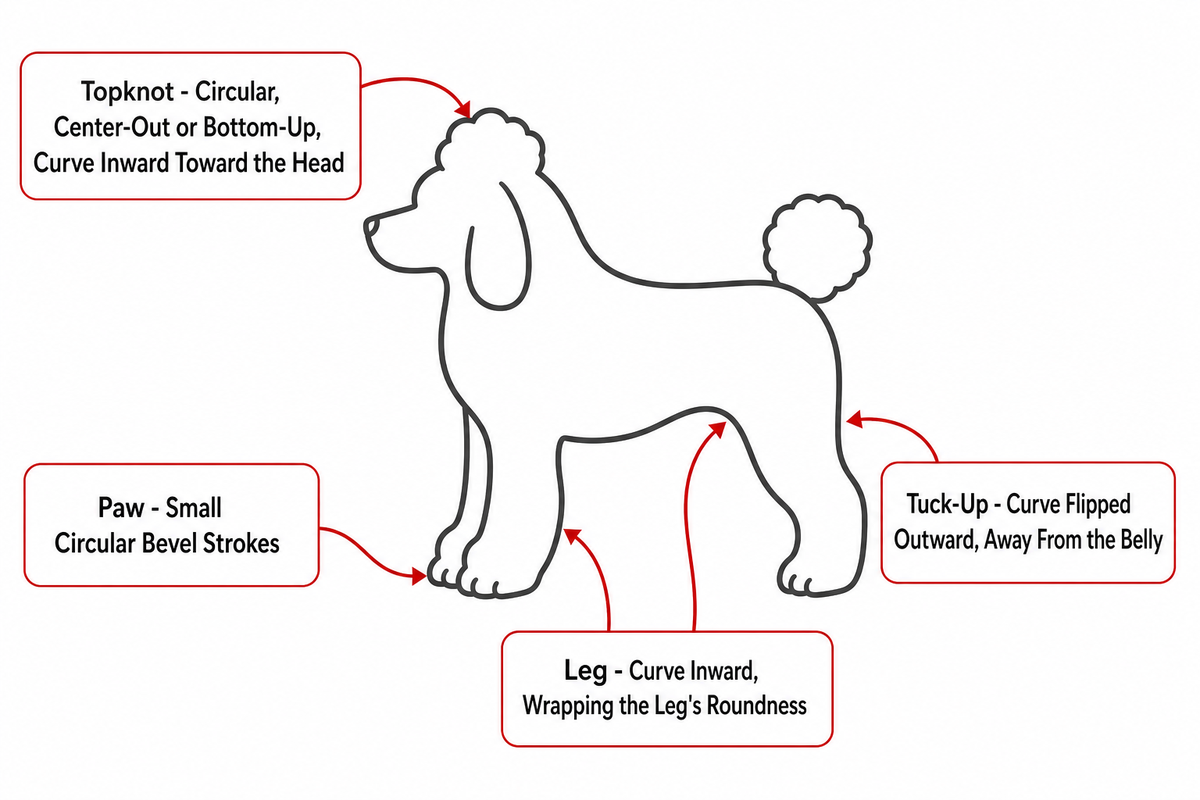
Every body zone has a different natural curve, and the stroke pattern that reads as clean on a topknot looks wrong on a leg. The table below maps nine common finishing zones to the stroke pattern and curve orientation used across published groomer technique guidance, built to land on the same bar the National Dog Groomers Association of America grades against — smooth, even, well-blended lines — because a stroke pattern that ignores a zone’s natural curve is what produces the flat facets and drift that standard penalizes. Treat it as a reference to check mid-groom, not a script to memorize in one sitting. An Australian government vocational competency standard for professional groomers (ACMGRM304) frames this correctly: technique selection by body area is conditional on coat type and the individual dog’s requirements, not a fixed rule that overrides everything else.
Scope note: this table describes general pet-grooming technique. Breed standards for competition and show grooming can be far stricter — some breeds are classified as “scissoring breeds” (Poodles, Bichons, Bedlington and Kerry Blue Terriers, Soft Coated Wheaten Terriers, among others) where scissoring the full coat is expected, while others restrict scissoring to feet, sanitary areas, and touch-ups only, with the rest of the coat handled by different techniques entirely. If you’re prepping a dog for a breed-standard show cut, follow that breed’s official standard instead of this general reference.
| Body zone | Stroke pattern | Curve orientation |
|---|---|---|
| Topknot / head | Circular, center-out or bottom-up | Curve inward, toward the head |
| Ears | Center-to-edge, small controlled cuts | Tips pointed toward the ear tip |
| Muzzle | Short strokes following jaw contour | Curve inward, ball-tip preferred |
| Chest | Long sweeping arcs, top to bottom | Curve inward, following ribcage |
| Flank / side | Overlapping horizontal passes | Curve follows the body’s natural taper |
| Leg column | Vertical, circular around the limb | Curve inward, wrapping the leg’s roundness |
| Paw / foot | Small circular bevel strokes | Curve inward, rounding the foot shape |
| Tail | Comb outward, taper to a point or cone | Curve follows the taper direction |
| Tuck-up / undercarriage | Shallow sweeping strokes, blade led by tips | Curve flipped outward, away from the belly |
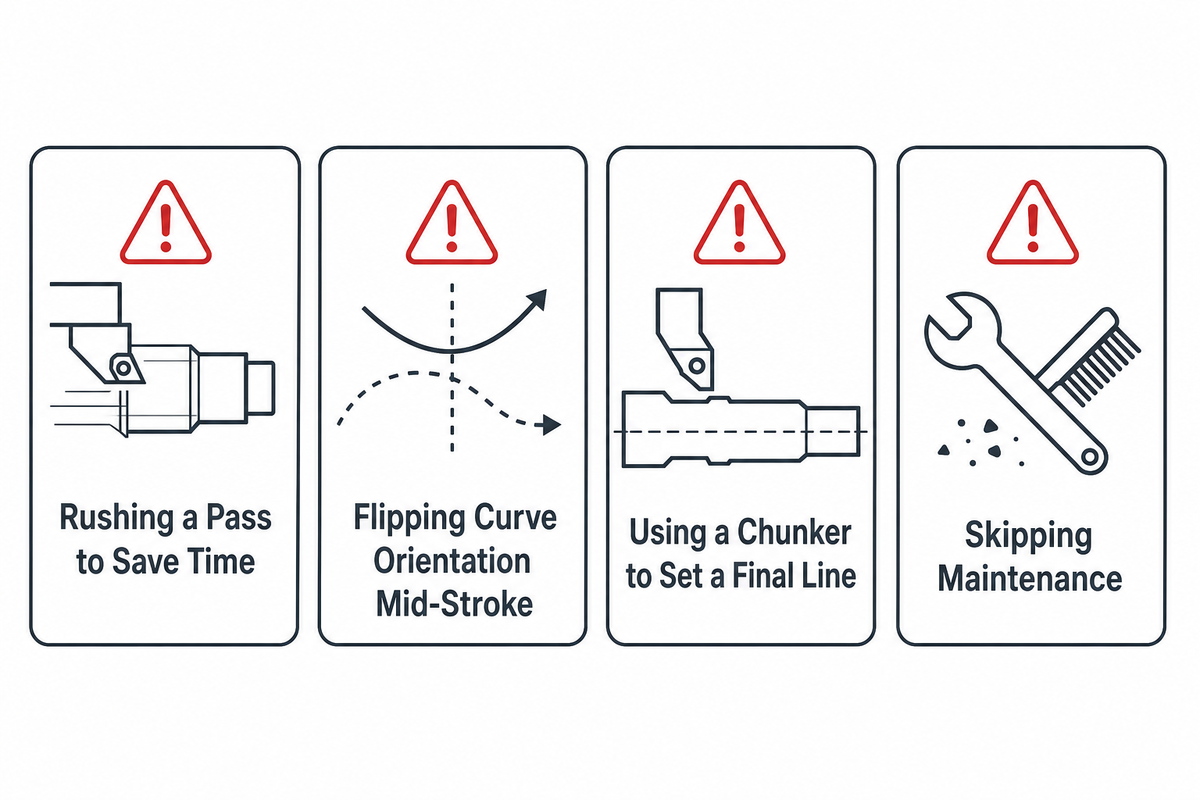
Most curved-shear mistakes trace back to one of four habits, and every one of them has a specific fix rather than a vague “slow down” answer — and each one is a direct way to miss the bar National Dog Groomers Association of America certification standards grade scissor work against: smooth, even, well-blended lines free of nicks and cuts.
Rushing is a leading cause of choppy, uneven lines — taking a section too fast means the blade drifts off the intended arc before you notice, and the fix is simply slowing the pace enough to see each stroke land, not switching shears. Curve-orientation confusion — pointing the arc the wrong way for the zone you’re shaping — is another common cause and is fixed by the same habit described in the grip section: pause and check which way the curve should face before each new zone, especially when switching from a convex area like a topknot to a concave one like a tuck-up. Inadequate practice time on a new shear before using it on a paying client’s dog shows up as hesitant, inconsistent strokes; ten or fifteen minutes on a stuffed animal or a cooperative practice dog closes most of that gap. And a neglected shear — unoiled pivot, loose tension, a dull edge — will produce a rougher line than technique alone can compensate for, no matter how correct your grip and stroke pattern are. Even an affordable shear keeps cutting cleanly far longer with a simple maintenance routine than an expensive one left dry and untensioned.
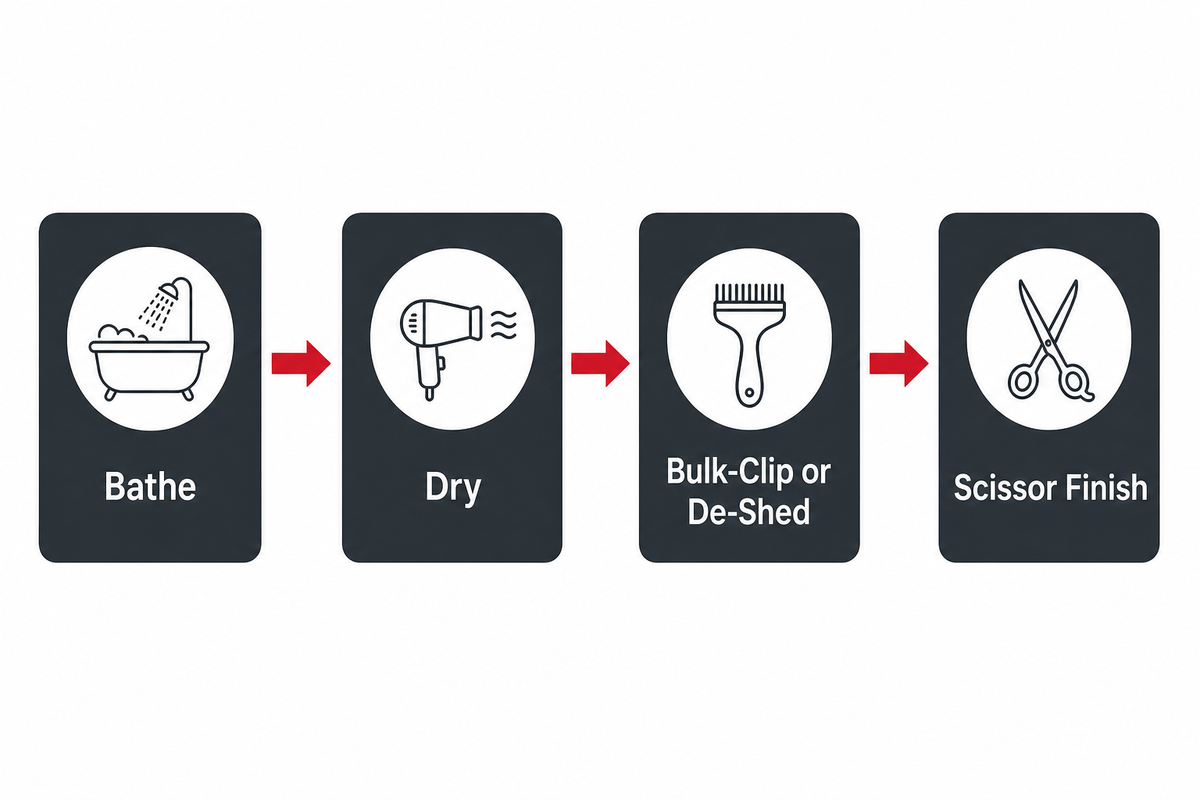
Curved-shear work is a finishing step, not a starting one, whether you’re in a busy salon or working through a mobile trailer route, and treating it as anything else is its own category of mistake. The typical sequence runs bathe, dry, bulk-clip or de-shed, then scissor finish.
The coat needs to be clean and fully dry before a curved shear can read its true length and texture, and any bulk removal — clipper work on a short-clip breed, or carding and raking on a double coat — belongs before the shear comes out, not after. Scissoring into a partially wet or matted coat produces an inconsistent line that looks fine wet and wrong once the coat finishes drying.
The professional bar for that finishing pass is well established: National Dog Groomers Association of America certification standards grade scissor work on whether it’s smooth, even, and well blended, with correctly set and beveled pattern lines, and free of nicks and cuts — which is a useful checklist to run against your own work regardless of whether certification is the goal. If a finished line doesn’t read as smooth and blended under that standard, the fix is almost always upstream in this guide: check curve orientation, stroke overlap, and whether the coat was fully prepped before the shear came out.

The U.S. Bureau of Labor Statistics attributes continued growth in animal care and grooming work to a straightforward driver: as more households include companion pets and pet-related spending keeps rising, demand for the people who groom, handle, and care for those pets grows with it.
BLS projects that overall employment in animal care and service occupations will grow 11% from 2024 to 2034, well above the average for all occupations. That growth shows up in more people learning scissoring technique for the first time, whether as new professional groomers or serious at-home groomers keeping up with a curly-coated dog between salon visits.
A related structural shift is worth noting alongside it, without overstating a direct link between the two: mobile and at-home grooming is currently the fastest-growing delivery channel in the broader pet grooming services market, expanding faster than the market overall as it appeals to time-constrained households and owners of anxious or large dogs who prefer grooming at home. Whether or not that channel shift specifically explains it, search interest in this exact topic has followed a similar arc — our own 60-month U.S. search-volume tracking (paid keyword-history data) on the exact phrase “curved dog grooming shears” shows average monthly search volume climbing from roughly 51.7 two to three years ago to roughly 480 over the most recent 12 months, a +828.4% increase that has since leveled off at that higher baseline rather than continuing to climb, which reads less like a passing spike and more like a skill genuinely more people are trying to learn.
This guide was built from professional-association scissoring standards, university canine-welfare guidance, occupational safety references, and Mackay Hair Scissors’ own manufacturing knowledge of what a curved blade does over years of forging, heat-treating, and honing it. We write technique content separately from our product pages because knowing how to cut well matters whether or not you buy from us.
MATSUOPRO is the Mackay Hair Scissors manufacturing brand for professional hairdressing shears, barber scissors, thinning shears, and pet-grooming scissors. We support salons, distributors, academies, grooming brands, and private-label buyers that need factory-direct production with practical material guidance.
Our buying guides are written to help purchasers compare steel grades, handle styles, blade geometry, surface finishes, logo options, packaging, MOQ, and sample validation before placing an OEM or wholesale order. The goal is to make each scissors specification easier to discuss with a real production team.
Factory-direct supply since 2014, with product lines covering professional cutting shears, barber shears, thinning scissors, texturizing scissors, left-handed models, and pet grooming scissors for international B2B customers.
We focus on Japanese 440C, VG10, and ATS-314 steel choices, convex and bevel edge geometry, ergonomic handle balance, tension systems, logo engraving, private-label packaging, and sample-based OEM confirmation.