Get in Touch with Mackayhairscissors Company
We use submitted details to respond to your quote request. Read our Privacy Policy.

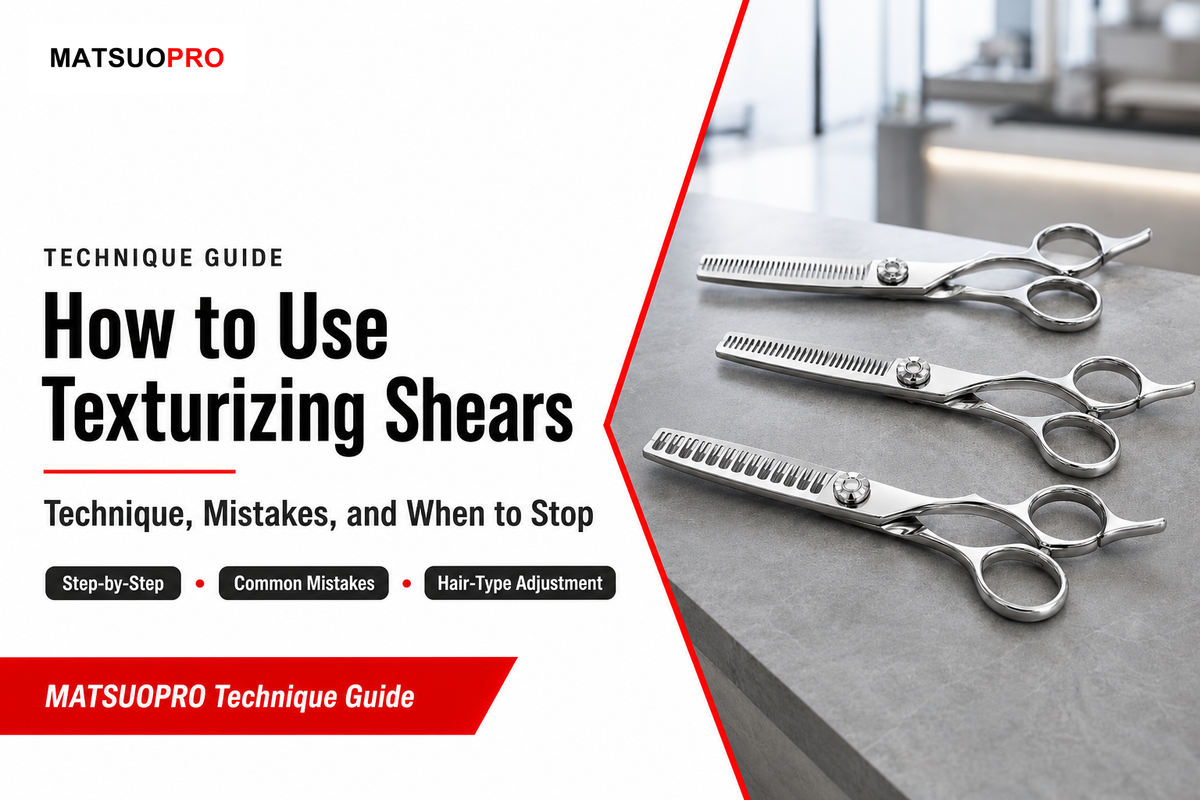
Updated August 2026 · Technique guide for professional stylists and barbers pursuing precise, controlled hairstyling with hair thinning shears and texturizing shears alike
Texturizing shears are hair-cutting scissors with one toothed blade and one straight or lightly toothed blade, built to remove a controlled fraction of hair within a section instead of cutting a solid line. If you already know how to use thinning shears, a texturizing shear will feel familiar in the hand, but knowing the mechanics of hair cutting with a toothed blade isn’t the same as knowing when to stop. Getting that fraction right, not just picking a tooth count, is what separates a soft, blended result from a frizzy finish with harsh lines. Hair texturizing is treated as its own licensed competency in official state barbering curricula, with dedicated requirements for tool care, technique proficiency, and safety procedure; it isn’t simply “thinning shears with a different name.” This guide covers the technique itself: how to read hair before the first cut, the actual cutting steps, how to tell when to stop, and the mistakes that turn texture into frizz.
| MATSUOPRO texturizing tooth range | 14–25 teeth |
| MATSUOPRO removal per pass | 25–40% |
| Named professional techniques | Point cutting, slicing, notching, channel cutting |
| Hair-state guidance | Wet or dry — conditional on goal, not universal (see below) |
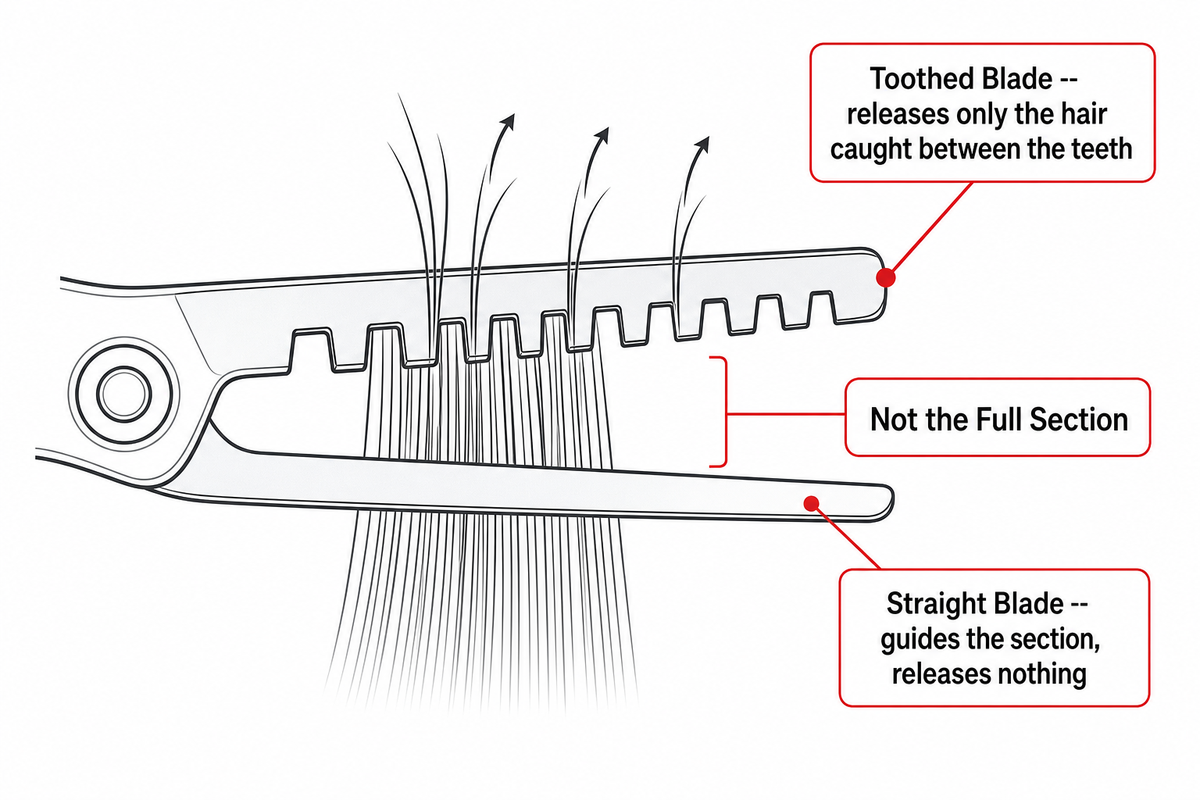
The mechanism is simple: a texturizing shear pairs a toothed blade against a straight or lightly toothed blade so that each closure releases only the hair caught between the teeth, not the full section. That’s the mechanical difference from a plain cutting shear, and it’s the reason texturizing shows up as its own licensed skill area rather than a footnote under haircutting.
New York’s official barbering curriculum lists “Hair Texturizing” as Subject 8.4 within a 170-hour Haircutting and Shaping block, with its own tool-care requirements and safety/disinfection procedures alongside plain scissor or razor cutting; hair and scalp analysis — texture, porosity, elasticity, and density — is itself a separate 20-hour required subject in the same curriculum.
Staying with technique, how to cut hair, how to judge the result, and when to stop, is the goal here, so you know how to texturize your hair with confidence on your very next section. For the terminology question (how a texturizing shear differs from a thinning shear) and the buying decision (which tooth count and steel to choose), see our Thinning vs Texturizing Shears guide and the professional thinning shears hub.
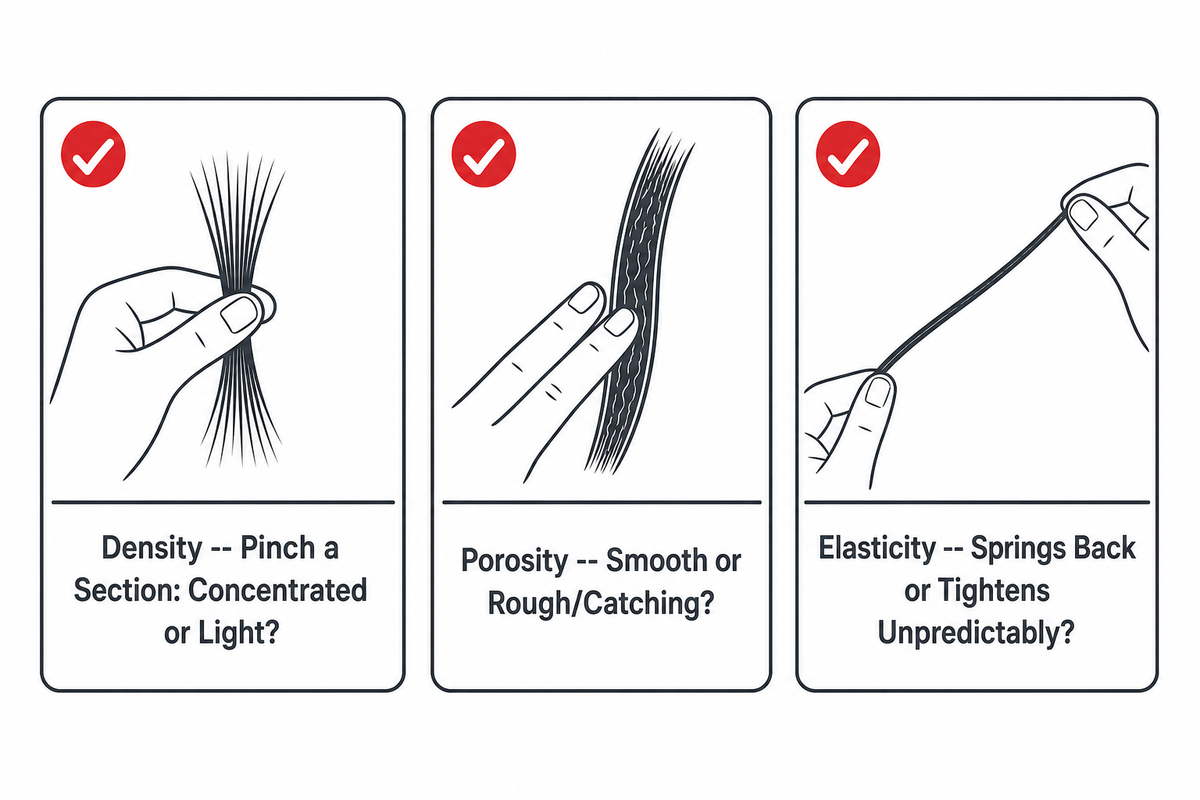
Density, porosity, and elasticity determine how a section will respond to a texturizing pass more reliably than eyeballing “how thick does this look.” The official New York State barbering curriculum lists texture, porosity, elasticity, and density as the four dimensions of hair analysis a licensed cutting service is built on, not a single “hair type” label. The Three-Tell Texturizing Test below turns that analysis step into a fast, texturizing-specific check you can run in under a minute before the first cut.
| Tell | What you’re checking | What it changes |
|---|---|---|
| Density | Pinch a section — is the bulk concentrated (dense) or already light? | Dense sections tolerate more teeth in contact; light sections need a lighter tooth count or a single light pass |
| Porosity / condition | Run two fingers up a dry strand — does it feel rough or catch (high porosity/compromised) or smooth (healthy)? | Compromised hair holds less texturizing before it looks stringy — reduce pass count, protect the zone, or skip it |
| Elasticity / pattern response | Stretch a strand gently — does it spring back cleanly, or does the curl/wave pattern tighten unpredictably when cut? This tell matters most on curly hair and wavy hair; straight hair shows its finished movement almost immediately. | Curl patterns shrink and hide the cut result while wet — dry-check before committing a second pass |
If any one of the three tells reads “compromised” — low elasticity, visible damage, or a curl pattern you can’t yet predict dry — that section gets a lighter pass or a skip, not the default cut. This is the same logic behind the official curriculum’s pre-service analysis step, applied specifically to a texturizing decision rather than the haircut as a whole.
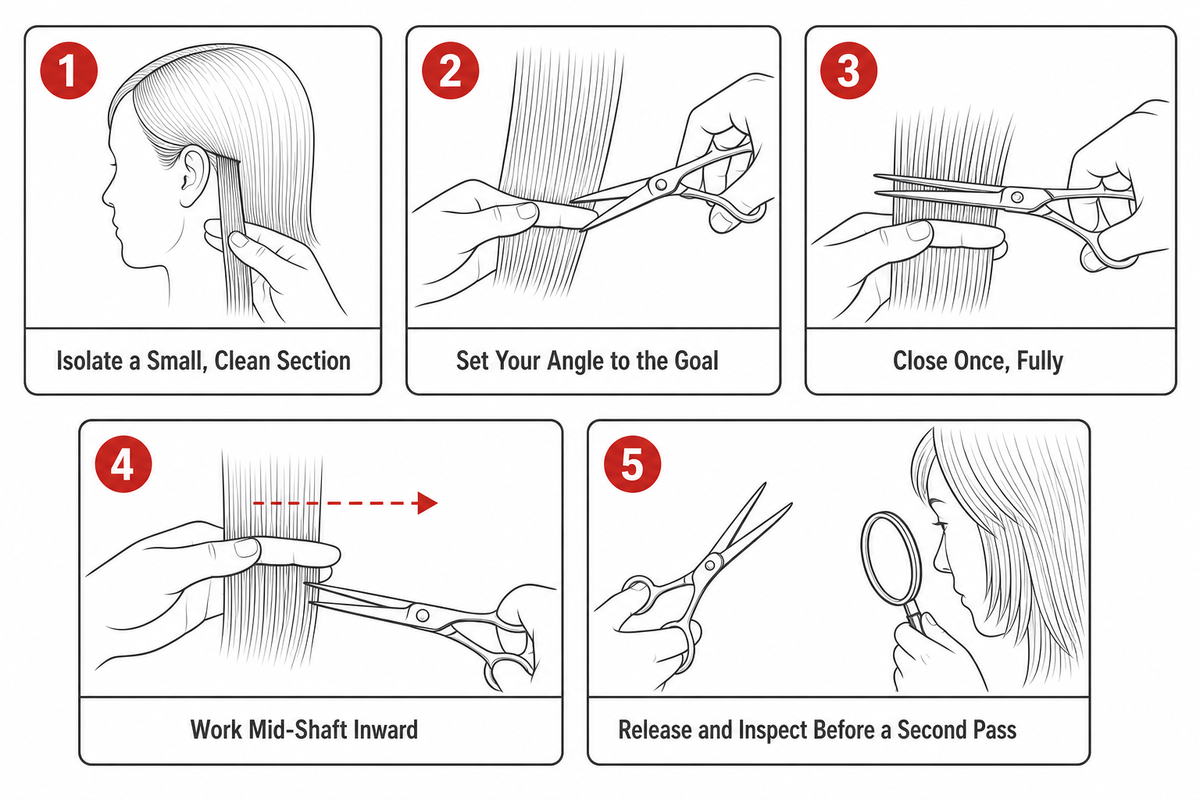
Isolating one section, closing the shear once with intent, and stopping to check the result before moving on is the whole approach for a conservative first pass; the goal is a controlled test, not a full-head pass on autopilot. This mirrors the official curriculum’s own pre-service/service/post-service structure for any haircutting step, applied here to a single texturizing pass. This is also the step where a versatile tool earns its keep: the same texturizing shear that removes bulk on a thick section can add texture with a lighter touch on a fine one.
“We often just texturize the ends, but that type of texturizing blends hair, versus cutting the mid-section which makes it move. So, when creating invisible texture focus on the mid-section of the hair.”
— Ellen Devine, Sam Villa ArTeam, on the technique she calls “invisible texturizing”
Running your hand down the hair shaft after each pass, not just looking across the hair from a distance, is the fastest way to feel whether a section is actually done, and it takes under 10 seconds per section once it’s a habit.
Every hairstylist eventually gets asked this in the first 5–10 minutes of a consultation, and hairstylists who insist on one fixed answer are usually overstating it. Either state works, and the right answer depends on what you’re checking, not a fixed rule.
Dry hair shows the finished movement, flyaways, and curl-pattern response immediately, which is why a dry check is standard before deciding on a second pass; wet hair can hide how much texture actually reads once it dries. For bulk removal early in a cut, wet sectioning can make control easier since strands hold together. There’s no single sourced “always dry” rule for texturizing specifically; treat the hair’s finished, dry behavior as the state that decides whether the section is done, and use whichever state gives you the section control you need to get there.
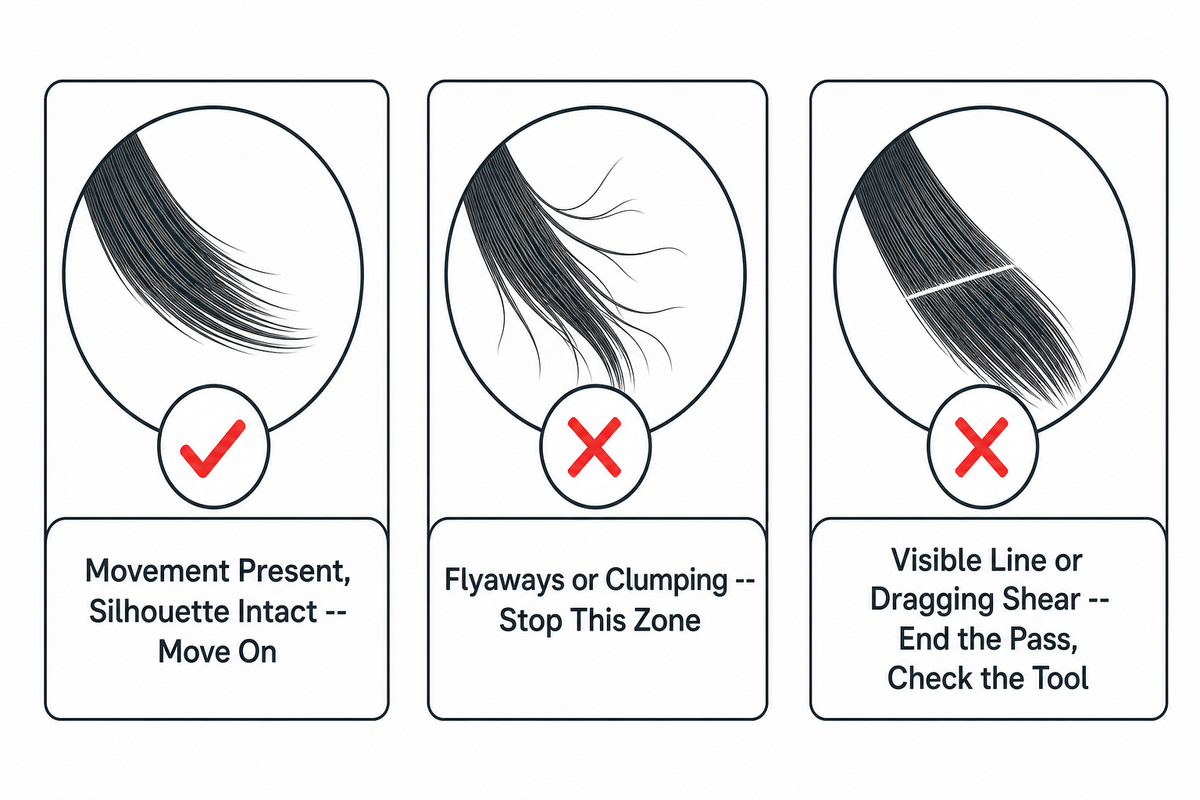
Checking the result after one pass, before a second, is the difference between a controlled texturizing service and one that drifts into over-thinning. The official cutting-service curriculum already structures every haircutting service into pre-service, service, and post-service steps; the Release-and-Check Sequence below turns that requirement into three concrete checks specific to a texturizing pass, run in order, each checkable in about 10–15 seconds.
| Check | What you observe | Next action |
|---|---|---|
| Movement present, silhouette intact | Section releases with visible softness; outline and top coverage still hold | Release fully, move to the next section — do not repeat this one automatically |
| Flyaways or loosened clumping | Individual short pieces stand up, or curl clumps start separating unevenly | Stop texturizing that zone; a second pass here is how a soft result turns stringy |
| Visible line, gap, or dragging shear | A hard demarcation between cut and uncut hair, a bald-looking gap, or the shear catching instead of gliding | End the pass for that section; check the tool (see mistakes below) before continuing elsewhere |
MATSUOPRO’s own texturizing tooth-count band, 14 to 25 teeth, roughly 25–40% removal per pass, describes why a single closure already removes a meaningful fraction of that section: at these tooth counts, “just one more pass to be safe” is rarely a small correction. Treat any of the three checks above as a hard stop, not a suggestion.
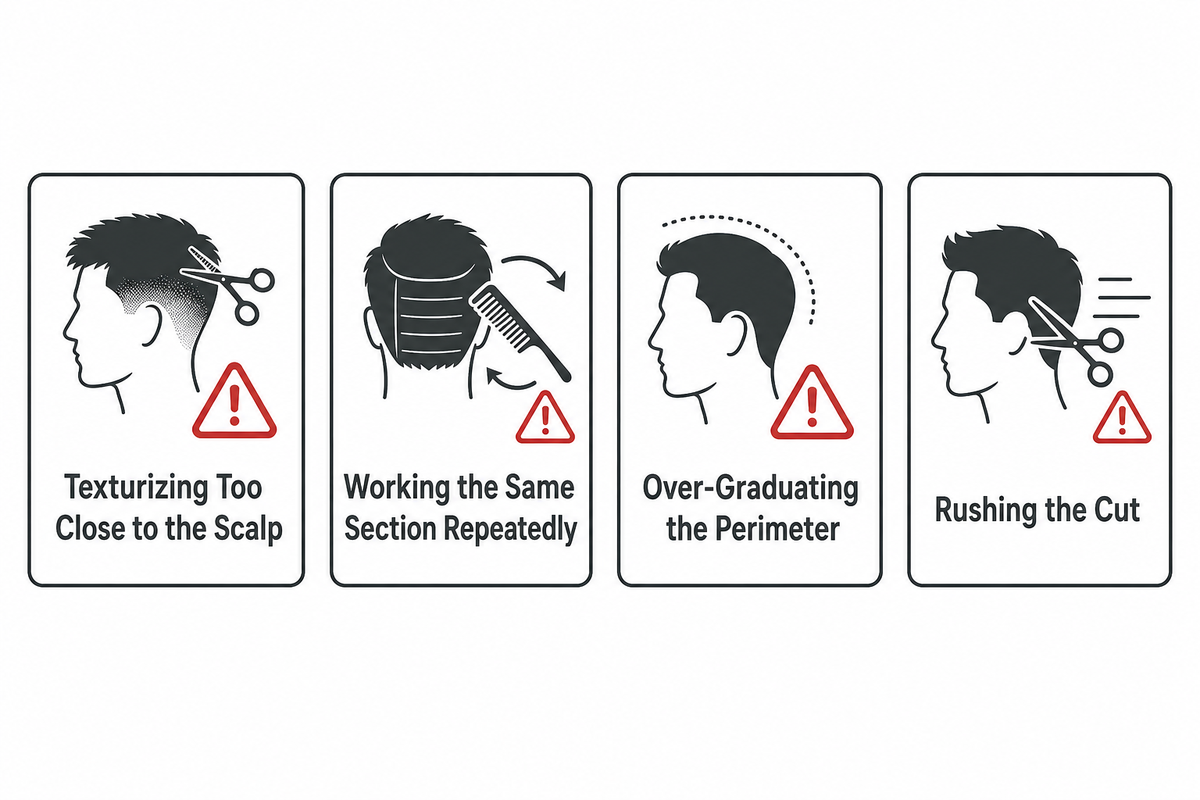
Most texturizing mistakes trace back to a handful of repeat patterns, which is why Pivot Point Academy’s own texturizing guidance devotes a dedicated section to problems to avoid rather than treating them as one-off errors.
Dragging, a jerky closure, or hair that slips instead of cutting cleanly across the hair shaft is a reason to inspect the tool, not to press harder — never use extra hand pressure as a substitute for a clean edge. Clean the teeth after each client, check tension, and take the shear out of service if one tooth catches; extra hand pressure isn’t a repair.
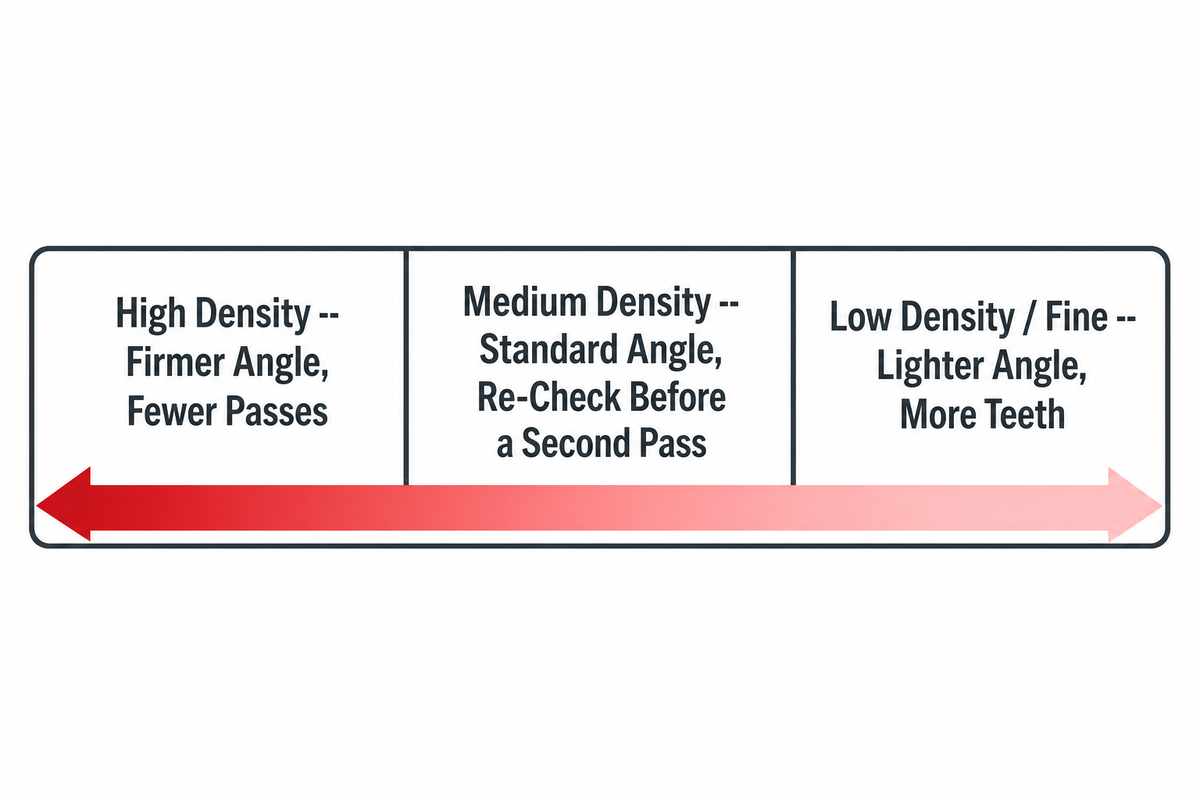
Hair-type adjustment works better as a set of independent variables than a single label. Texture, porosity, elasticity, and density are separate factors in a cutting-service analysis under the official curriculum; a head can be, for example, high-density with low porosity, which calls for a different approach than high-density with compromised (high-porosity) strands. Check where your own texturizing shear’s published tooth count falls in the table below before adjusting angle or pass count.
| Hair Type / Characteristic | Tooth Count | Angle & Pass Adjustment |
|---|---|---|
| Very high density, coarse | 14–16t | Firmer angle (near 45°); one full pass usually removes enough |
| High density | 16–18t | 45° angle, standard mid-shaft pass |
| Medium density, average | 18–20t | 30–45° angle, one pass, re-check before a second |
| Low-medium density | 20–22t | Lighter, closer-to-parallel angle; avoid root area |
| Low density, fine, thin | 22–25t | Lightest closure available in range; keep passes away from the root by at least 2–3 cm |
| High porosity / chemically treated / compromised | Any (reduce pass count) | Cut half the passes you’d otherwise plan; a compromised strand shows stringy breakage sooner than an undamaged strand under the identical shear |
| Curly / coily pattern | 20–25t | Cut dry when possible and evaluate curl-by-curl — the pattern shrinks and can hide how much has actually been removed while wet |
| Wavy pattern | 18–22t | Either wet or dry state works; check the dry result before a second pass |
| Straight pattern, healthy | 14–25t (full range) | Most forgiving pattern — the full tooth-count range applies; let the density check (not the pattern) set the count |
Tooth count alone isn’t a reliable cross-brand guide, which is worth knowing before you shop by the number on the box. An independent industry reference site’s transcription of one manufacturer’s own published spec pages shows a 20-tooth texturizing model at a 15–20% cut ratio and a 17-tooth model in the same line at 25–30% — a meaningful jump for a 3-tooth difference, and the exact size of that jump is specific to this one maker’s family, not a formula that transfers to another brand’s “17-tooth” or “20-tooth” shear. If you’re sizing a new shear rather than adjusting technique on one you already own, MATSUOPRO’s 40-46 tooth fine-blending shears cover the finer, higher-tooth-count end of the thinning/blending range in more depth.
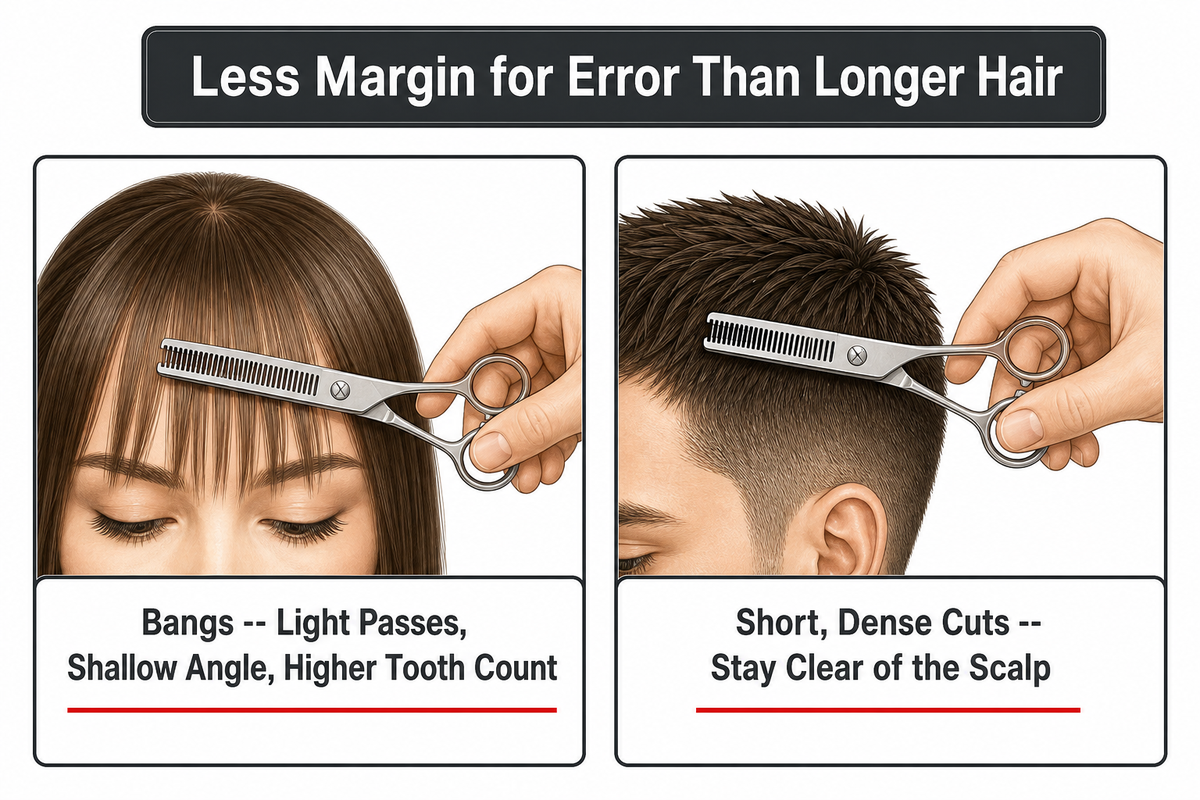
Knowing how to texture bangs, and specifically how to use texturizing shears for bangs, matters more than anywhere else on the head: bangs and short cuts leave less hair available to hide an uneven pass, so the margin for error is smaller than on longer hair with more length to spare. On longer sections a slightly uneven pass grows out or blends in; on short hair it doesn’t. Associated Barber College’s own technique guidance notes that fine or delicate sections need a lighter touch than thicker ones — the same density-driven logic applies here, since bangs are almost always a thinner, more visible section. Point-cutting toward parallel removes less hair per closure if you want a lighter touch here. Two adjustments matter most in these high-visibility zones:
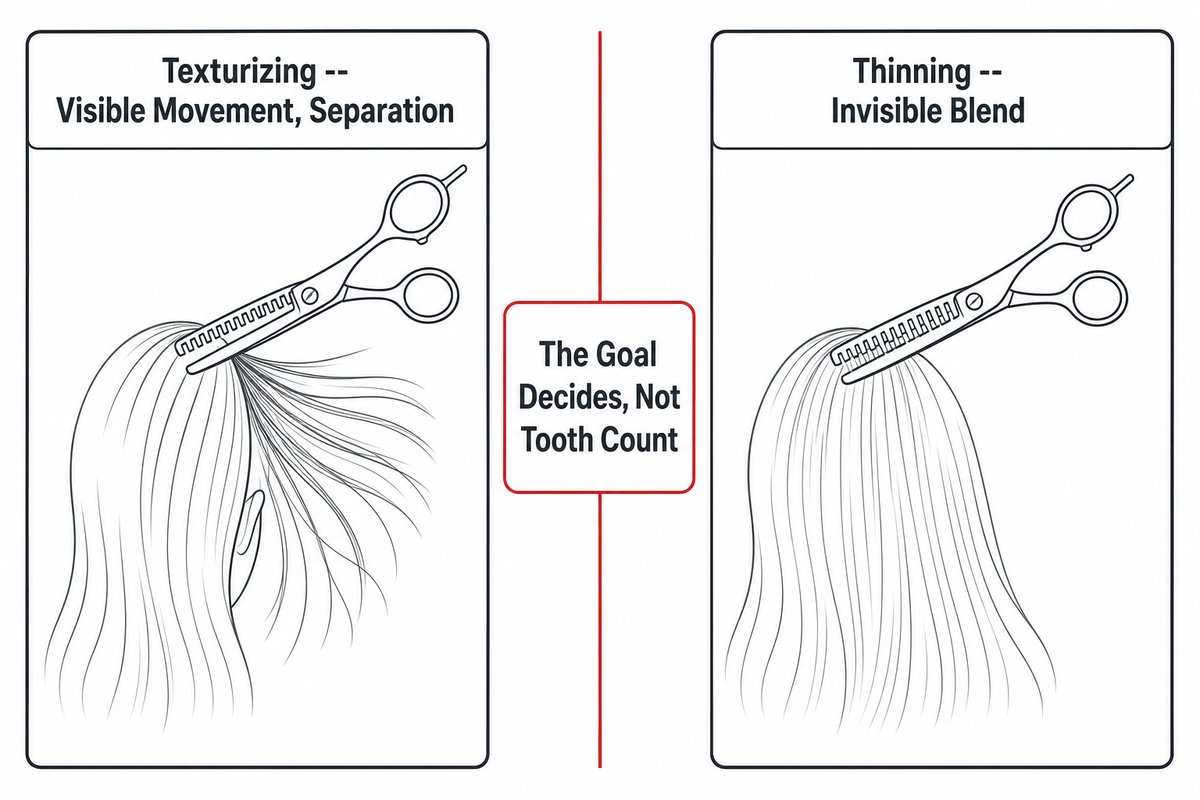
Short answer: both work by removing a fraction of hair within a section with a toothed blade, but texturizing shears are built for visible movement and separation while thinning shears are built to blend invisibly. Some stylists still use the terms hair thinning scissors, hair with thinning shears, thinning scissors, and texturising (the UK spelling) interchangeably out of habit, and the use of thinning shears versus texturizing shears genuinely overlaps across brands — a shear marketed as a “texturizer” from one maker can carry the same tooth count as another maker’s “thinner.” The deciding factor is the goal, not the number of teeth on the box: whether you’re aiming to thin out hair evenly with no visible trace on a section of hair, or leave deliberate texture behind, since a shear with fewer teeth doesn’t automatically remove hair more aggressively than one with more. Picking the wrong one for a client’s actual goal is the most common mistake here: a texturizing shear where the goal was invisible blending leaves visible chunking that can take weeks to grow out, and the reverse choice produces a flat result that never separates. MATSUOPRO publishes distinct bands for each — 14–25 teeth for texturizing, 28–46 for thinning — precisely so that mismatch is avoidable. For the full terminology breakdown, tooth-family comparison, and buying guidance, see our dedicated Thinning vs Texturizing Shears guide.
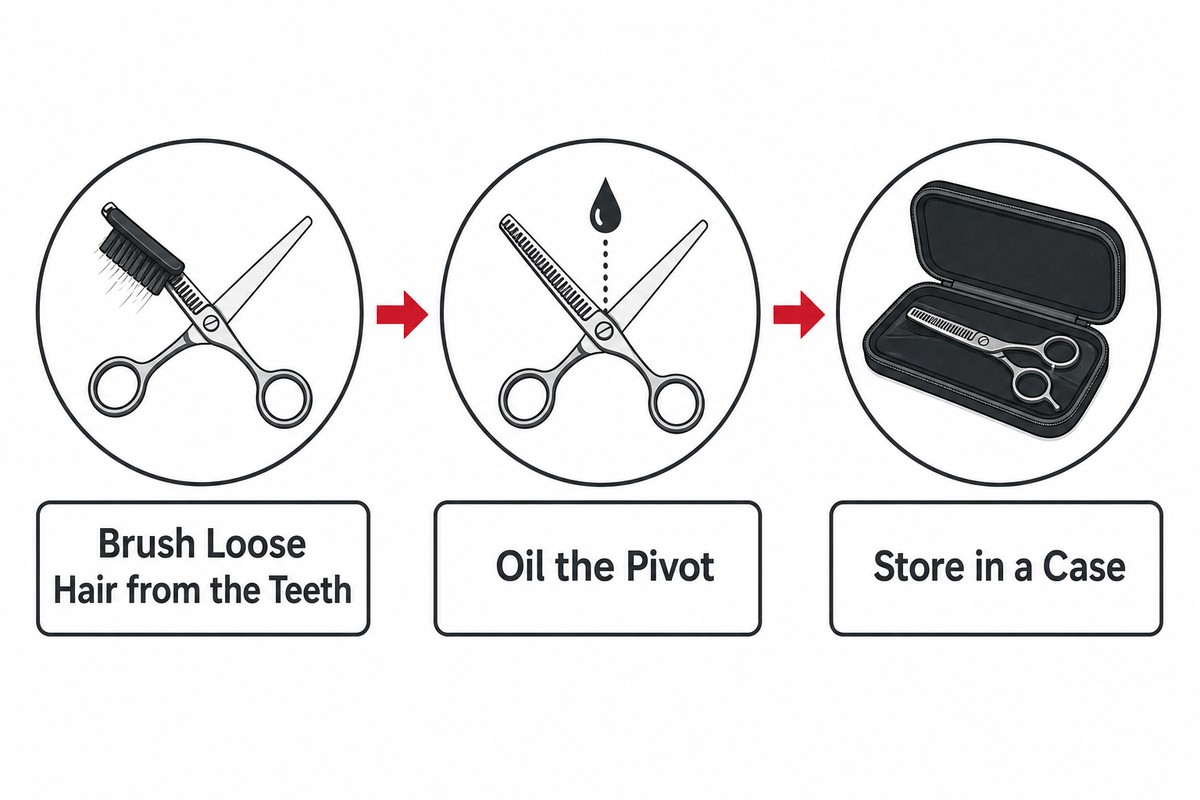
Toothed blades trap hair and moisture between the teeth in gaps as small as 1 mm, so they need more attentive care than a plain cutting shear. Brush loose hair from the teeth after every client (30 seconds is enough), apply a drop of oil at the pivot, and store the shear in a case rather than loose in a drawer; a well-maintained texturizing shear can hold its edge for 3–6 months of normal salon use before it needs a specialist sharpening. Safety and disinfection procedure is a formal, required step around every haircutting service in official barbering curricula, not an optional add-on; follow your state board’s current disinfectant and contact-time rules for shears between clients. For the full maintenance and sharpening routine, see our thinning-shears care and sharpening guide.
If you’re finding yourself fighting your current texturizing shear, pushing hair instead of releasing it, or landing outside the tooth-count band that actually matches your everyday hair types, that’s a sizing problem, not a technique problem. MATSUOPRO’s texturizing shear lineup is built factory-direct across the 14–25 tooth range this guide references, in Japanese steels including VG10 and ATS-314, with a published tooth-count selection framework and third-party hardness reports available on request.
See the Texturizing Shear Lineup →
Most tutorial content on hair thinning shears and texturizing hairstyling either shows a full styling result or a full walkthrough of using thinning scissors, with no middle ground, so we wrote the middle ground: what happens between “hold the shear” and “here’s the finished layer.” This guide focuses on texturizing-shear technique specifically because it’s the piece missing from our own site’s shear content — we already cover thinning-vs-texturizing terminology and tooth-count buying decisions elsewhere, but not the actual cutting mechanics. As a factory that forges texturizing shears in the 14–25 tooth range across four steel grades, we see firsthand how much of a “bad shear” complaint traces back to pass count and angle rather than the tool itself. This piece draws on a published state barbering curriculum and named trade-press and barber-college technique sources, alongside our own published product data where it is labeled as ours, so it holds up regardless of which brand of shear is in your hand.
Reviewed by the Guangzhou Mackay Hair Tools Products Co., Ltd. technical team
MATSUOPRO is the Mackay Hair Scissors manufacturing brand for professional hairdressing shears, barber scissors, thinning shears, and pet-grooming scissors. We support salons, distributors, academies, grooming brands, and private-label buyers that need factory-direct production with practical material guidance.
Our buying guides are written to help purchasers compare steel grades, handle styles, blade geometry, surface finishes, logo options, packaging, MOQ, and sample validation before placing an OEM or wholesale order. The goal is to make each scissors specification easier to discuss with a real production team.
Factory-direct supply since 2014, with product lines covering professional cutting shears, barber shears, thinning scissors, texturizing scissors, left-handed models, and pet grooming scissors for international B2B customers.
We focus on Japanese 440C, VG10, and ATS-314 steel choices, convex and bevel edge geometry, ergonomic handle balance, tension systems, logo engraving, private-label packaging, and sample-based OEM confirmation.